
KSP Scripting (NI Kontakt) :: BASICS :: Create a Resource Container & Publishing your Release
Before we start scripting we should create a resource container where we put in all the files we need for our instrument (e.g graphic files or impulse responses etc.)
Content:
-
create a resource container
-
the text file for graphic content
-
workflow developers / kontakt behavior
-
Purpose of the nkr file?
-
publishing your instrument
create a resource container
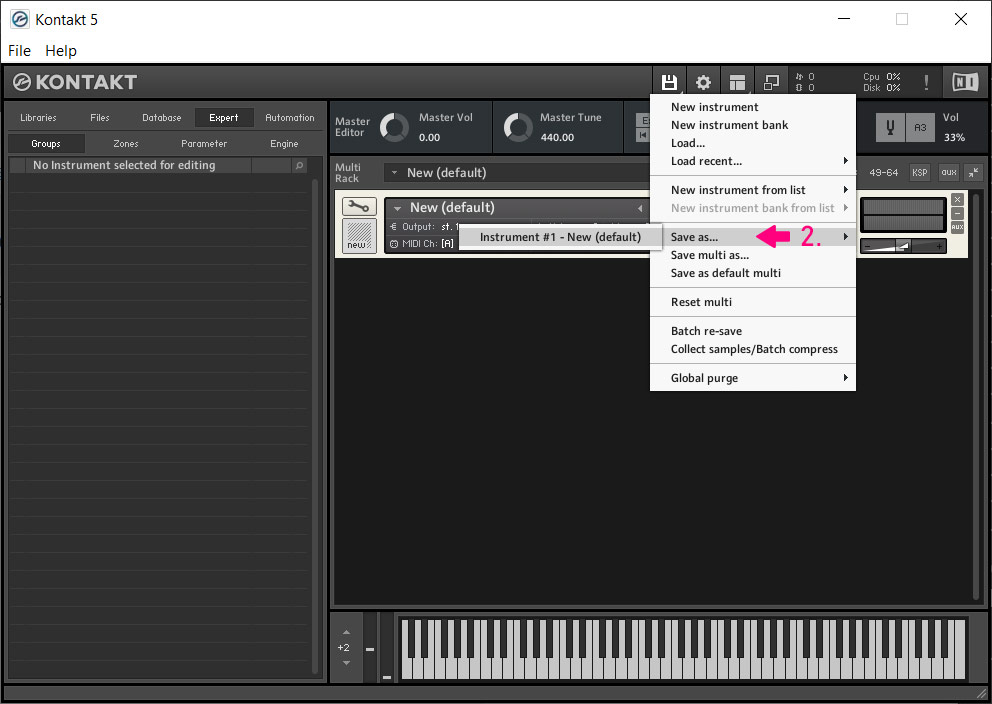
- start Kontakt and create a new instrument

- Save your instrument into a new folder
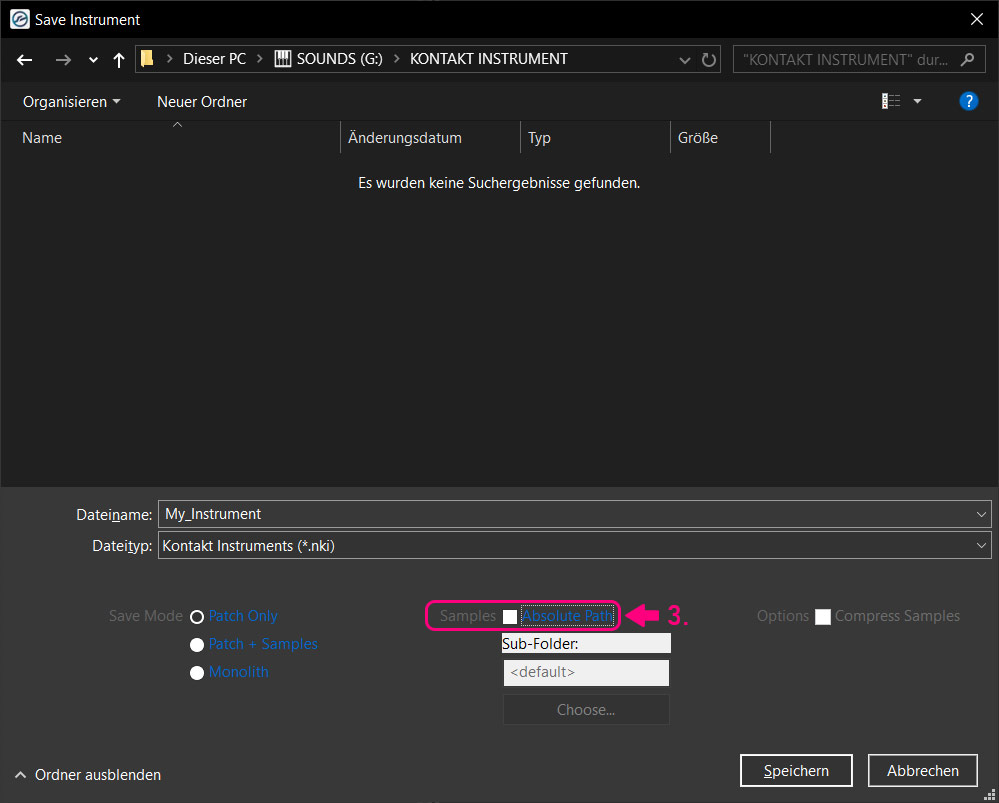
- DON’T check absolute path (this keeps all file paths relative learn more)
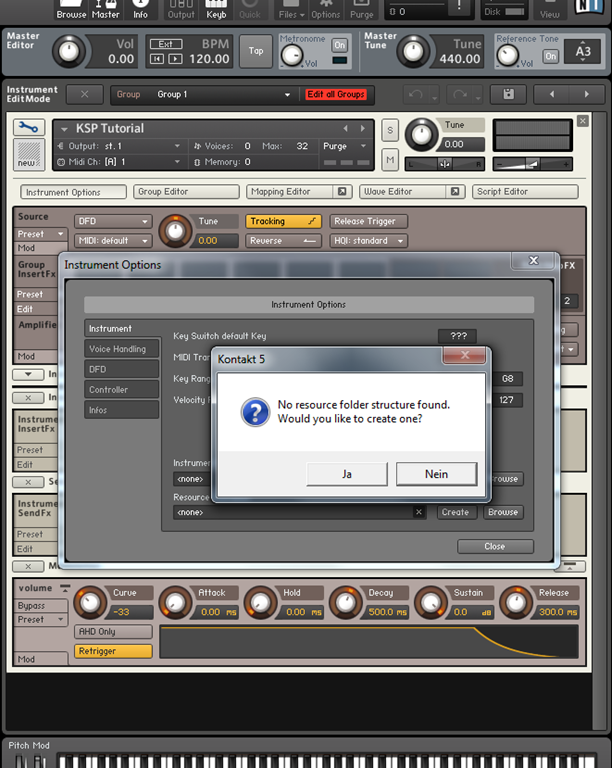
- click on the wrench button, click on “instrument options” and click “create” (see image)
- chose the folder you have just stored your nki/instrument into and enter a name for the resource container. Click “save”
- when you are getting asked to create one, confirm
- Save your instrument again (DON’T check “Absolute paths”) (learn more)


Kontakt will create a “Resources” folder (with sub folders) and a “nkr” file.
Both resources folder & nkr file have the same purpose: they both contain all resources of your instrument like graphics, impulse responses or scripts.
But you can only access the Resources folder, not the nkr container file since all your content is being packed and “encrypted” into this nkr file.
Each time we click on the create button, Kontakt will update the nkr file and copy (and “encrypt”) our resources into the nkr. Provided that we have put all our files correctly into the related resource sub folders (read more below)
With graphic content we also need to add a little text file for each image (see below):
The content (FOLDER locations)
Extra text file for graphic files
with any graphic content we also need to store a special text file into the Resources\pictures\ folder. Kontakt needs this file to be able to handle special properties for our graphic files, like animation steps, alpha channel etc.
- we have to store all graphics or images into Resources\pictures\
- all impulse responses into Resources\ir_samples\
- scripts to be included into Resources\scripts\
- for each image we also have to add a *.txt file into Resources\pictures with the image’s filename. The text file is declaring the properties of the related image. So if we store an image called “wallpaper.png” we also have to add a “wallpaper.txt” with this content:
Has Alpha Channel: yes
Number of Animations: 0
Horizontal Animation:  no
Vertical Resizable: no
Horizontal Resizable: no
Fixed Top: 0
Fixed Bottom: 0
Fixed Left: 0
Fixed Right:  0
the txt file should be stored in UTF-8 or ANSI. Also make sure you added a 10th blank line, which may be required for some reasons.
workflow developers / kontakt behavior
When we open our instrument (nki), Kontakt will first look into the Resources folder. Only if Kontakt can’t find any files there, it will proceed looking into the nkr file. So the Resources folder always has priority over the nkr file which is very useful for developers because we don’t need to update the nkr file again and again.
Purpose of the nkr file?
Why do we need the nkr file at all? The nkr file simply contains all our resources in encrypted form. There are many reasons for not letting everyone access your resources. Probably you may not want others to use them for their own projects or you don’t want others to edit your files.
publishing your instrument
To publish your instrument hit the “create” button for the last time, and verify that all resources have been included into the nkr file.
Simply publish your whole instrument folder without the Resources folder. So just the nki, nkr, nkc file. And of course also your samples, snapshots, midi files etc.
Unless you want to share all your resources of course. In this case simply share your whole instrument folder including your Resources folder.
Read the distributing your Instruments & updates article to learn more about upload and update practices of your instruments and possibly save server costs.
Before publishing
Before publishing your instrument it’s really highly recommended to verify that all files are really included into the nkr file.
For this just copy your instrument folder (without the resources folder) to another location on your hard drive. Open the instrument (nki) from the new location and check if anything is missing. The most obvious you will notice instantly are missing images.


Wesley Henriques
Hello all, being to Kontakt generate a folder with samples (.nkx and .nkc) what is possible? I try to generate this folder to encrypt my wavs but unfortunately I can not, please help me … Thank you very much! Thank you!
YummyBeats
(in reply to Wesley Henriques)
hey,
as far as I know you can only create nkx files with a special agreement with Native Instruments. You need to sign a contract with them and buy special licenses, then your instrument can also be used with the free Kontakt player and can be added to the “libraries” tab. For normal usage you don’t need the nkx files since any graphical content or impulse responses etc is stored into the nkc and nkr file when creating it.
To create an nkc & nkr file just follow this article and keep in mind to first save your whole instrument as nki file. Save it with relative paths so that you are able to move your instrument with all related files to any folder, later on.
wav files are stored outside when saving your instrument as “patch + samples”. It’s recommended to create a sub-folder inside the folder where your nki file is located. Simply enter the name of your sub folder into the “Sub-Folder:” field. You can also compress the samples as ncw files. Just check “Compress Samples”.
Hope this helps!
George
Could not pack 1files!
(Maybe missing picture property .txt files?)
YummyBeats
(in reply to George)
In general every image needs to have a correct .txt file (as described above) in order to get packed into the resource container.
If you are working on a mac you should also add a blank 10th line after “Fixed Right: 0” (9th line) as stated by @Serge below
Serge
Hi _
Be careful about the number of lines in the .txt file of a graphic file: need to add a blank line in tenth position (with nothing) to work properly with an Apple machine.
Best
YummyBeats
(in reply to Serge)
Thanks for the hint.