Required:
License:
Creative Commons Attribution 4.0 International License.
http://creativecommons.org/licenses/by/4.0/
You may use this ksp script, modify it, build upon it, redistribute it, as you like (even commercially), as long as you keep all credits inside the script code.
If you would like to remove the credits or publish them somewhere else, please contact us
Download all files to this article premium
- NKI file: open scipt tab
- open resource container
- additional ksp script file for sublime text
License:
Creative Commons Attribution 4.0 International License.
http://creativecommons.org/licenses/by/4.0/
You may use this ksp script, modify it, build upon it, redistribute it, as you like (even commercially), as long as you keep all credits inside the script code.
If you would like to remove the credits or publish them somewhere else, please contact us
Content
- adjustable variables
- the full script
- on init – explained
- macro – explained
- example: add functions to the buttons
Adjustable Variables – Modify Grid
on init
   declare const $BTN_COUNT_ROW := 4 // sets the amount of buttons in a row
   declare const $BTN_COUNT := 32 // sets the overall button amount
   declare const $MARGIN_TOP := 12 // sets the overall top margin to adjust the y-position in px
   declare const $MARGIN_LEFT := 0 // sets the overall left margin to adjust the x-position in px, default is centered
   declare const $PADDING_RIGHT := 4 //sets the right space between the single columns / buttons
   ///////////////////////////////////////
   declare const $BTN_WIDTH := 121
   declare const $BTN_HEIGHT := 29
   declare @btn_image_name := "MyImageName_"
   //////////////////////////////////////
   .
   .
   .
   .
end on
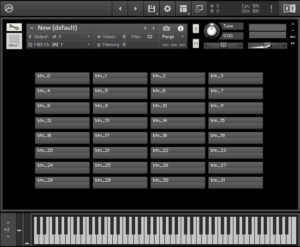
$BTN_COUNT_ROW := 4 here we can set the columns or amount of buttons inside a row in this case we got 4 buttons a rowdeclare const $BTN_COUNT := 32 here we can set the overall amount of buttons. In this case we wanna create 32 buttonsdeclare const $MARGIN_TOP here we can adjust the y-position of the whole matrix in pxdeclare const $MARGIN_LEFT here we can adjsut the x-position of the whole matrix in pxdeclare const $PADDING_RIGHT here we can define a spacer between the single buttons or columnsdeclare const $BTN_WIDTH := 120 here we can set the button width in pixels. In this case it’s 120pxdeclare const $BTN_HEIGHT := 28 here we can set the button height in pixelsdeclare @btn_image_name := "MyImageName_"here we can set a custom image for our buttons. Each button has an individual image and we can set any image filename we want. To add individual images for each button simply create image files like this: “MyImageName_0.png”, “MyImageName_1.png”, “MyImageName_2.png” and so on.premium content
unlock the full article
including all downloads!
unlock premium content


Stephan
Hi very usfull code thx a lot, but where can i declare each button seperatly for a fuction? thanks for the help. CheersYummyBeats
Hey, thx.
you can simply add another similar macro with an on ui_control command like this:
(the article has also been updated with a more detailed example)
Henrik Hansson
Nice article! Thanks! But, how can I get only one button to be allowed to be active/highlighted/pressed at once? i.e. if one is pressed, the previously pressed one should get deactivated (get status = 0). Hope the question makes sense....YummyBeats
At best create a function deactivating all buttons. Then inside the on ui_control of your buttons you call that function and after on you set the affected button to 1 again. Like this Of course in your turnoff_all_buttons function you can also work with set_control_par and use an ui_id array with a while loop to deactivate all buttons.Henrik Hansson
Thanks for the fast reply! I'll try this!Florian
The scripped posted above did not work for me, but I tried a few things and came to this I'd have to do this for every button. can I automate this??YummyBeats
Hmm, thats strange. It should work. Probably there is another error somewhere in your code?! It's also importnat that you put $btn1 := 1; $btn2 := 1; $btn3:=1 after "call deactivate_all_btn". Otherwise the function would set all your buttons to 0 again.