
KSP Scripting (Kontakt) :: Custom UI: positioning controls (Grid vs. Pixel)
to create your custom UI and place custom controls you can chose between a grid system or exact pixels.
used commands & parameters
make_perfview
makes the current tab visible (outside the edit mode)
set_ui_height_px(<height>)
sets the height of the ui in px (max height since Kontakt 6 = 750px)
set_ui_height (<height>)
sets the height of the ui using the tabular grid system (max rows = 8)
set_ui_width_px(<width>)
sets the width of the ui in px (max width = 1000 px)
declare ui_switch $<variable-name>
creates a switch with the name <variable-name>
declare ui_knob $<variable-name>(<min>,<max>,<display-ratio>)
creates a knob with the name <variable-name>
move_control_px(<variable>,<x-position>,<y-position>)
this moves the control inside your UI from top left position
move_control(<variable>,<x-position>,<y-position>)
place the ui elements in the standard Kontakt grid
set_control_par(<ui-ID>,<control-parameter>,<value>)
$CONTROL_PAR_HEIGHT, $CONTROL_PAR_WIDTH
Download Resources
- all examples from this article as nki
- with open script tabs
- and with open resource folder
Grid vs. Pixels
Pixels
Free space with 632 x 540px (max). Since Kontakt 6 it’s 1000 x 750px (max). If you don’t use the set_ui_width_px() command, the default width is always 632px.
Nowadays probably any UI was made width the pixels system.
We can also mix the pixel and grid system but this is not recommended.
| Cons | Pros |
|
|
Grid
Table structure with 6 columns and max 8 rows. You can set the max row amount (= the ui height) by set_ui_height(<rows>). You can not change the width via columns, only via pixels.
To get familiar with the grid system you can use this generator. It’s a great tool for understanding the basics, however I personally wouldn’t recommend it for ambitious projects.
We can also mix the grid and pixel system but this is not recommended.
| Cons | Pros |
|
|
Position ui controls with Pixels
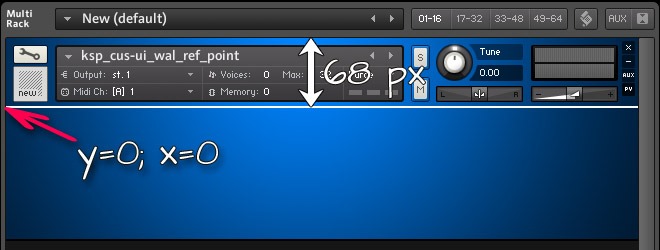
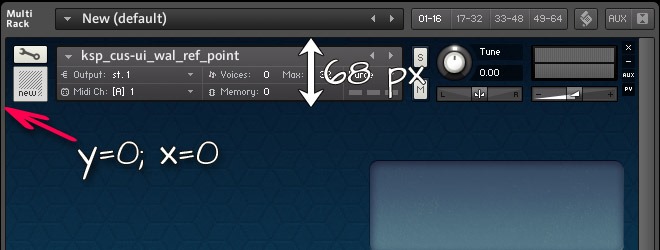
Every ui element (including the wallpaper) have their reference point in the top left (x=0 and y=0) So to place controls (knobs, buttons etc) you simply need to measure the distance from this point to your ui element in pixels. Simply use the ruler of your preferred graphic software to do so. But keep in mind that the reference point starts below your instrument header:
Sometimes you want to use some simple calculations to place your controls which can be helpful when you have many controls of the same kind (like knobs) and want to place them next to each other with an equal spacer. Or if you want to place your control to the very right. You can use this simple method to position a control to the bottom right:
By Calculation: center a button (pixel system)
on init
    {SET: common variables}
        declare $pos_y {variable to store y position}
        declare $pos_x {variable to store x position}
        declare const $UI_WIDTH := 1000 {in px}
        declare const $UI_HEIGHT := 150 {in px}

    {SET: ui space & bg}
        make_perfview
        set_ui_width_px($UI_WIDTH)
        set_ui_height_px($UI_HEIGHT)
        set_control_par_str($INST_WALLPAPER_ID,$CONTROL_PAR_PICTURE,"wallpaper2")

    {SET: button}
        declare ui_switch $button
        set_control_par(get_ui_id($button),$CONTROL_PAR_HEIGHT,28)
        set_control_par(get_ui_id($button),$CONTROL_PAR_WIDTH,100)

        $pos_x := ($UI_WIDTH-100)/2 {subtract the button width from the total ui width and divide by 2}
        $pos_y := ($UI_HEIGHT-28)/2 {subtract the button height from the total ui height and divide by 2}
        move_control_px($button,$pos_x,$pos_y)
 end on
- set the height of your UI
set_ui_height_px($UI_HEIGHT) - set the width of your UI
set_ui_width_px($UI_WIDTH) - set the width and height of your button (width:100px, height:28px).
- use
move_control_px(variable,x_position,y_position)to center the button by simply subtracting the button size from the UI sizes, divided by 2:
x-position = ($UI_WIDTH - 100px)/2
y-position = ($UI_HEIGHT - 28px)/2
related file: placing_controls_by_calc_px.nki
By Measuring: placing a knob inside a box inside your wallpaper

create your wallpaper
use a ruler to measure the position where you want to place your Knob (x and y coordinates from the top left, in pixels). Again, remember the instruments header: the top reference point is 68 pixel below where your wallpaper starts (you can also use an auxiliary line within your graphic software to mark the actual height)
In this example we want to place the knob(s) to x=382px; y=146px which looks like this then (also see the related code below):

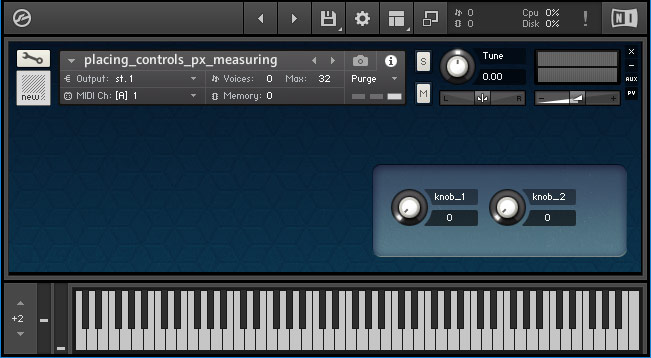
Example (file: placing_controls_px_measuring.nki)
on init
     make_perfview
     set_control_par_str($INST_WALLPAPER_ID,$CONTROL_PAR_PICTURE,"wallpaper")
     set_ui_height_px(166)

     declare ui_knob $knob_1 (0,1000,1)
     declare ui_knob $knob_2 (0,1000,1)

     move_control_px($knob_1,382,78)
     move_control_px($knob_2,480,78)
 end on
Positioning ui controls with the Grid System
as mentioned above you may want to use the grid system if you want to place your controls quickly with a predefined structure. The Grid system works like a table with 6 columns and max 16 rows (depending on the height). You simply place your UI control into one of those cells like shown:
Example (file: placing_controls_grid.nki)
on init
     make_perfview
     set_control_par_str($INST_WALLPAPER_ID,$CONTROL_PAR_PICTURE,"wallpaper2")
     set_ui_height(3)
     declare ui_knob $knob_1 (0,1000,1)
     declare ui_knob $knob_2 (0,1000,1)
     move_control($knob_1,3,3)
     move_control($knob_2,4,3)
end on


Hinweis