
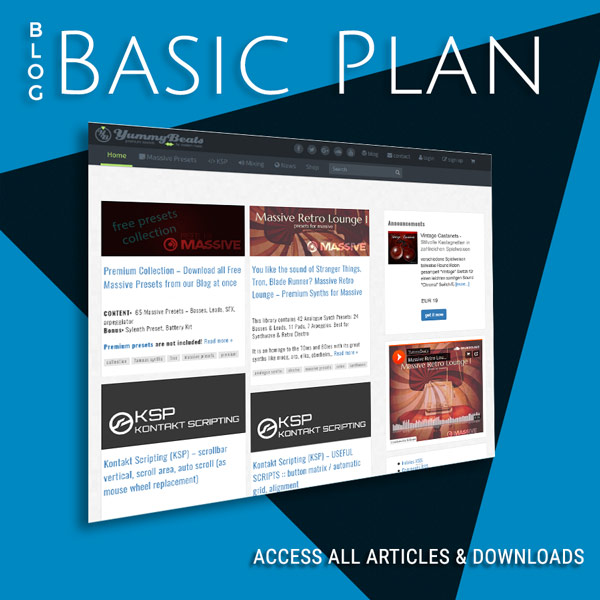
Kontakt Scripting (KSP) :: Custom UI :: Buttons & Animations (on, off, pressed, mouse over states)
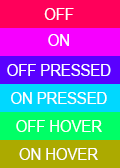
in this tutorial we will create “animated” buttons for Kontakt 5 or 6 with the following states:
- off
- on
- pressed off
- pressed on
- mouse hover off
- mouse hover on
Download all files to this tutorial
- Open Resource Container: Buttons, Wallpaper
- NKI file: the working script
CONTENT
-
creating the first button image
-
aligning button states vertically
-
add the text file
-
declare the button via ksp script
-
Followup: VARIOUS USE CASES FOR BUTTONS
(toggles, disabled buttons, reading and setting button states)
A FEW NOTES – OVERVIEW
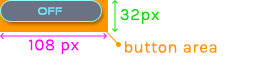
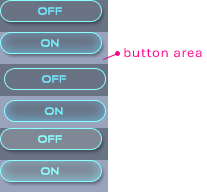 Actually the button animation is done by the button image itself. Which is a sprite sheet containing all button states aligned vertically one after another. Thereby every button state or button area (2nd picture) has to be of the exact same height in pixels.
Of course the actual button can be of any height we want. It can also be smaller as the button area. This can get important when working with button fx like shadows or glowing borders etc. Whenever there are some transparent areas around the actual button.
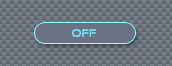
Inside the Kontakt Script Editor we then define the width and height of our visible button are via KSP (read below)
In this case width = 180px and height = 32px.
Kontakt automatically shows the right button area (sprite) according to the current button state.
1. Create the first button image
 Simply create a button with your favorite tool (like gimp, photoshop, illustrator, paint …). Just make sure you can store your image file as true alpha-channel png. Also already think of how you would like to realize the different button states eg. a glow effect for the mouse hover states maybe?!
When your button is done, create a new file with the width of the button area and with a height of 6 times the button area.In
this case width = 180px; and height = 192px. (=> 6x32px)
Now we copy the whole button into that new file, duplicate it 6 times and arrange them vertically (read next chapter)
2. Align the button states vertically
 Every button area has to be of the exact same height in pixels.
If the actual button is smaller than the button area, make sure that each button “sits” at the exact same position inside the related area. Otherwise there can be ugly glitches e.g. the button moves around when hovering over it or when pressing it.
On the other hand there can be situations where we want exactly this effect e.g to simulate a 3D push effect. This is also shown in this example.
HINT: if your got transparent areas around our button, aligning those buttons, can get frustrating. Since we have no clue how and where to position our button copies. Because we can’t see the actual button area boundaries (they are just transparent).
We can either count the transparent pixels around the button then or we can add a rectangle around the button to visualize the button area as a guideline (like shown with the second image)
In our graphics tool we create a group (or layer folder) out of our button and helper-rectangle, so that we can copy & paste all together. This makes aligning the button states easy. When everything is done, we just hide the rectangle helper again.
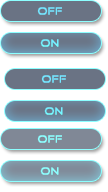
Now we can edit the individual states (off, on, pressed, mouse over) like adding a glow effect for all “on” states or slightly move the button around within our button area, to simulate a 3D push effect like shown.
When everything is done save the whole sprite as png and copy it into the resource folder of your instrument.
3. Add the text file
we also have to create a little text file.
- Copy the below text into a text editor
- add a 10th (blank) line
- save it as txt inside “Resources/pictures”
- The txt file must have the same file name as the button image.
- It is required and and gives Kontakt extra information about our images.
Like how many animations we got (in this case 6)
Has Alpha Channel: yes
Number of Animations: 6
Horizontal Animation:  no
Vertical Resizable: no
Horizontal Resizable: no
Fixed Top: 0
Fixed Bottom: 0
Fixed Left: 0
Fixed Right:  0
4. Declare the button via KSP (User Interface)
Luckily we don’t have to code a complex event state animation or something like that.
We can simply declare a button, define all parameters like width, height, position and set our image file via $CONTROL_PAR_PICTURE.
As long as we have added the previous text file correctly with 6 animation steps, Kontakt will do the rest for us.
on init
    {INIT UI}
    declare const $UI_HEIGHT := 164 {this constant is used to define the total UI height}
    set_ui_height_px($UI_HEIGHT) {sets the actual UI height}

    make_perfview {shows our UI when leaving the Kontakt edit mode / wrench button}
This sets the overall UI. Read the comments nearby
 {BUTTON 1}
        {decalre const}
        declare const $BTN1_X := 108+1
        declare const $BTN1_Y := 32+1

        declare ui_button $button1
        set_control_par_str(get_ui_id($button1),$CONTROL_PAR_PICTURE,"button")
        set_control_par_str(get_ui_id($button1),$CONTROL_PAR_TEXT,"")
        set_control_par(get_ui_id($button1),$CONTROL_PAR_WIDTH,$BTN1_X)
        set_control_par(get_ui_id($button1),$CONTROL_PAR_HEIGHT,$BTN1_Y)
        move_control_px($button1,(632-$BTN1_X)/2,($UI_HEIGHT-$BTN1_Y)/2-16) {position: center button}
end on
declare const $BTN1_X := 108+1
declare const $BTN1_Y := 32+1
first we declare some constants which define the width (109px) and height (33px) of our Button.
We may have to add one pixel because some Kontakt versions tended to crop one pixel with buttons and sliders. So maybe you can remove the +1 px again with your Kontakt version.
declare ui_button $button1
creates the actual button
set_control_par_str(get_ui_id($button1),$CONTROL_PAR_PICTURE,"button")
set our button image. Simply use the image filename without the file extension.
set_control_par_str(get_ui_id($button1),$CONTROL_PAR_TEXT,"")
removes the default text of the button. Otherwise Kontakt would place a text “button1” over our button image
set_control_par get_ui_id($button1),$CONTROL_PAR_WIDTH,$BTN1_X
set_control_par get_ui_id($button1),$CONTROL_PAR_HEIGHT,$BTN1_Y)
sets the button width and height, we’ve defined with the two constants before
move_control_px($button1,(632-$BTN1_X)/2,($UI_HEIGHT-$BTN1_Y)/2-16)
This positions the button in pixels within our UI. Actually this centers our button in the middle. This is explained in detail in the complex UI article


BR
Hello, how could I toggle a button to make it disable with another button? Like the key switching function. It should be simple, but I cannot find it.
YummyBeats
(in reply to BR)
EIDT: By “disable” you mean the off state right?
Just use the button’s name to set its state like this:
on init
	declare ui_button $myButton
	declare ui_button $anotherButton
end on

on ui_control($anotherButton)
	$myButton := 0 {sets $myButton into the off state including the picture state}
	$myButton := 1 {sets $myButton into the on state including the picture state}
end on
In case you really meant disabling a button there is a new article now which explains buttons in detail and also shows various use cases (like toggles, disabled buttons or controlling multiple buttons at once):
various use cases for buttons
Dwight
The issue I’m having is when I insert my custom button and trigger it with a note, it shows all 6 frames at once. Even though I’ve specified the button size. what am I doing wrong?
YummyBeats
(in reply to Dwight)
Have you put the correct text file into your pictures folder? The number of animations needs to be exactly 6 for a button (see instructions above)
Although I beleive this is not the actual problem here: did you keep the exact same distances from one button state to another with your button image? (see the example above) Kontakt devides the total height of your button image by 6 and thats the height of one button state then.
How do you trigger your button actually inside the note on? Maybe you wanna use a label with an overlayed transparent button instead? So that you have more control over the picture states. See this animation tutorial
James
Hi, thanks very much for the tutorial!
On line 3 of the {button 1} part, should that number be 180? My button kept cutting off till I changed that!
YummyBeats
(in reply to James)
EDIT : Sorry I totally got you wrong first .. the 108 (or 109 to be more precisely) should be fine. The image width is 108px so I actually don’t know why it gets cropped with your setup?!
Did you use another image file or resize this one?
I don’t know if this is a bug with Kontakt or if it has any purpose but yes, you may need to add one more pixel to your actual image size.In this case it’s 108+1 or 32+1. The +1 was just used to point out this issue more clearly. Of course you can also do $BTN1_X := 109 and don’t need to do this extra addition.
Royd
Oh, I get it. Thanks for finding time for answering my questions.)))
Royd
Please help. How to make a ui button invisible ? Or how to create an area on gui that will playback oneshot sample on mousecklick?
YummyBeats
(in reply to Royd)
To hide a button (or any other ui element) use:
set_control_par(button_id, $CONTROL_PAR_HIDE, $HIDE_WHOLE_CONTROL)
You may also wanna read this article. It shows how it works in detail, plus you can download the script
To playback a sample via a button you can do this:
Royd
(in reply to YummyBeats)
I have read “ksp reference manual” . I already tried “set_control_par”, but the button is still visible 🙁 that’s why I decided that I was doing something wrong. I thought that maybe there’s some other method . however, the button works as I need, just still visible . well, I’m going to try again . thanks for the answer.)))
YummyBeats
(in reply to Royd)
probably you did not use the ui_id but the button variable?!
try:
set_control_par(get_ui_id($button_name), $CONTROL_PAR_HIDE, $HIDE_WHOLE_CONTROL)
Royd
(in reply to YummyBeats)
I found a bug in my script , but when the button is invisible, its playback function is unavailable too . the button just becomes inactive. but I want to make the interface similar to “ni studio drummer” . something like click on a snare and the snare drum sample is played .
YummyBeats
(in reply to Royd)
Actually a function doesn’t get inactive when hiding a ui element. Of course you can’t execute the function anymore with hidden elements. Probably u wanna make an invisible but not hidden button? To do so just use a transparent image as background image for the button. And eg a label for the actual background if needed.