
Kontakt Scripting (KSP) :: Custom UI :: Complex User Interface with multiple Screens/Menus inside one Script Tab
In this Complex User Interface tutorial we will build a fully functional UI with multiple Screens: main screen, FX screen and about screen. Whereas the FX screen holds a sub menu for two different FX: a LoPass filter and a LoFi FX.
Please accept YouTube cookies to play this video. By accepting you will be accessing content from YouTube, a service provided by an external third party.
If you accept this notice, your choice will be saved and the page will refresh.
NOTE: This UI was made with Kontakt 5. Compared to nowadays approaches it is outdated and overkill.
It is still recommended to read this article if you are new to Kontakt Scripting because it may help you to overall understand KSP better.
ALSO NOTE: This article is only about the GUI including a functional Navigation. The Knobs are not functional! But you can learn how to use Knobs to control the Kontakt engine in the engine par article
you can move on to these articles:
- if you are advanced …
- … and if you are already working with Sublime move on to working with macros
- … and if you are on Kontakt 6 and above. Check out the ui_panel article which simplifies a lot now.
better not skip this article:
- if you are new to Kontakt scripting. Because this article still helps to better follow all the other articles.
if you are a very beginner it is also recommended to read the basic tutorials first.
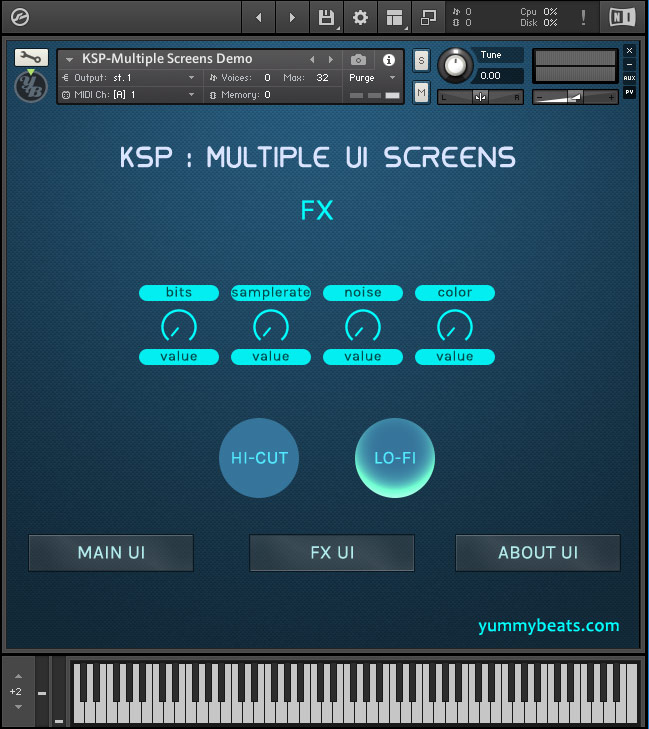 Having multiple screens in one script tab is a common way modern Kontakt user interfaces are built, giving the best usability. The downside: coding gets more complex since we have to put ALL controls (like sliders, buttons, labels, images etc) into one script tab. We also have to create multiple button actions to hide all controls & bg images of inactive screens, and show the active ones. So all controls are still there but not visible nor accessible.
In this article we work without macros, so the code is more complex as it actually could be. But the classic code helps you to learn Kontakt scripting better.
Download all files to this tutorial premium
- Open Resource Container: Buttons, Knobs, Wallpapers
- NKI file: the working script
License: This ksp script is licensed under a Creative Commons Attribution 4.0 International License.
You may use it for your projects (also commercially) and edit it as you like, as long as you keep all credits
Content:
-
create resource container
-
create wallpapers
-
create knobs & buttons
-
Script – init callback
-
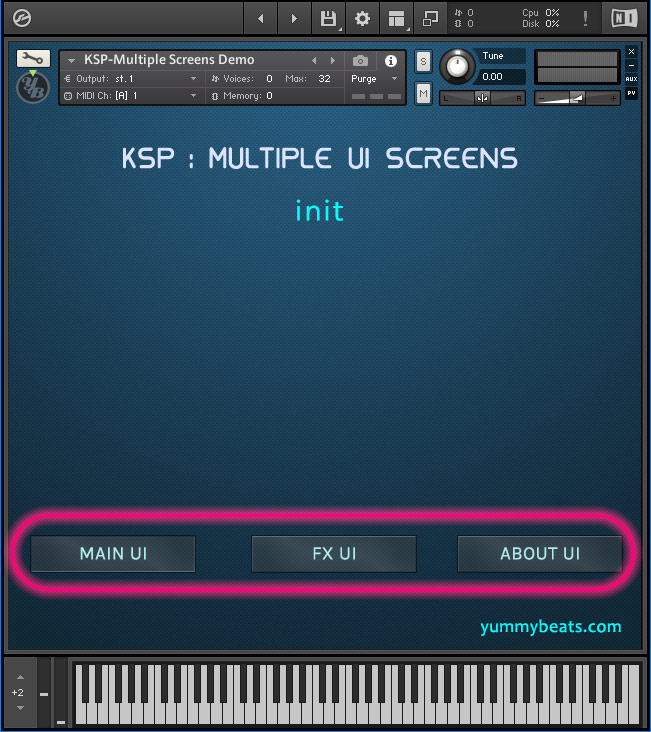
Script – the navigation buttons (on ui_control)
-
Script – the functions (show / hide UI elements)
-
The Full Script
Also of your interest:
-
drawer with slide in/out animation
-
dialog windows / popovers with responsive backdrop
-
own font types
-
Drag & Drop Script / Draggables
-
Animation Sequence (e.g. for VU-Meters)
4. Script – init callback
on init
  set_ui_height_px(540)
  make_perfview
  set_script_title("Multiple UI")
  set_control_par_str($INST_ICON_ID,$CONTROL_PAR_PICTURE,"yb_ico"){sets your brand icon}
initialize the UI, set the basic wallpaper and make it viewable outside the script tab
{DECLARE : Global Vars}
    declare $count
declare global variables which are used throughout the whole script several times
main nav buttons for our screens (main, fx, about)
{SET: MAIN NAV}
 declare %arr_btn_nav_main[3]
{constants nav main}
 declare $BTN_NAV_WIDTH := 167
 declare $BTN_NAV_HEIGHT := 39
Then we declare some constants holding the size and the width of our navigation buttons in pixels.
{btn nav main}
 $count := 0
 declare ui_switch $btn_nav_main {declares / add a button}
 make_persistent($btn_nav_main) {keeps the button's last value when closing & reopening Kontakt}
 %arr_btn_nav_main[$count] := get_ui_id($btn_nav_main) {adds the main button to your array, at position 0 since $count = 0}
 set_control_par_str(%arr_btn_nav_main[$count],$CONTROL_PAR_PICTURE,"btn_nav_main") {sets the picture of the element 0 in your array which is the main button}
 set_control_par_str(%arr_btn_nav_main[$count],$CONTROL_PAR_TEXT,""){removes the default button text which would be 'btn_nav_main'}
 set_control_par(%arr_btn_nav_main[$count], $CONTROL_PAR_POS_Y,424)
 set_control_par(%arr_btn_nav_main[$count], $CONTROL_PAR_POS_X,20)
 set_control_par(%arr_btn_nav_main[$count], $CONTROL_PAR_WIDTH,$BTN_NAV_WIDTH)
 set_control_par(%arr_btn_nav_main[$count], $CONTROL_PAR_HEIGHT,$BTN_NAV_HEIGHT)
Now we declare the first of our navigation buttons. This one will show the main screen when clicking on it (and hide all other screens at the same time).
With set_control_par we will decline all button parameters like the button image and the position of the button. We are working with the array above. With the $count variable we can adress the specific button stored in that array. This way we can duplicate the whole code block by just changing the button variable via adjusting $count, by changing the x position ($CONTROL_PAR_POS_X), and by changing the button image ($CONTROL_PAR_PICTURE)
{btn nav fx}
 $count := 1
 declare ui_switch $btn_nav_fx {alter the button name}
 make_persistent($btn_nav_fx)
 %arr_btn_nav_main[$count] := get_ui_id($btn_nav_fx){adds the fx button to your array, at position 1 since $count = 1 now}
 set_control_par_str(%arr_btn_nav_main[$count],$CONTROL_PAR_PICTURE,"btn_nav_fx") {alter the button image}
 set_control_par_str(%arr_btn_nav_main[$count],$CONTROL_PAR_TEXT,"")
 set_control_par(%arr_btn_nav_main[$count], $CONTROL_PAR_POS_Y,424)
 set_control_par(%arr_btn_nav_main[$count], $CONTROL_PAR_POS_X,241) {alter the x-position}
 set_control_par(%arr_btn_nav_main[$count], $CONTROL_PAR_WIDTH,$BTN_NAV_WIDTH)
 set_control_par(%arr_btn_nav_main[$count], $CONTROL_PAR_HEIGHT,$BTN_NAV_HEIGHT)
as said we can now copy the whole code block for each of the other nav buttons. We simply need to alter the button name, $count, x-position and the button image.
This is a place where macros would come in very handy to save some lines of code
{btn nav about}
 $count := 2
 declare ui_switch $btn_nav_about {alter the button name}
 make_persistent($btn_nav_about)
 %arr_btn_nav_main[$count] := get_ui_id($btn_nav_about)
 set_control_par_str(%arr_btn_nav_main[$count],$CONTROL_PAR_PICTURE,"btn_nav_about") {alter the button image}
 set_control_par_str(%arr_btn_nav_main[$count],$CONTROL_PAR_TEXT,"")
 set_control_par(%arr_btn_nav_main[$count], $CONTROL_PAR_POS_Y,424)
 set_control_par(%arr_btn_nav_main[$count], $CONTROL_PAR_POS_X,447) {alter the x-position}
 set_control_par(%arr_btn_nav_main[$count], $CONTROL_PAR_WIDTH,$BTN_NAV_WIDTH)
 set_control_par(%arr_btn_nav_main[$count], $CONTROL_PAR_HEIGHT,$BTN_NAV_HEIGHT)
premium content


bodes
I’m having trouble hooking it up to the engine.
Pretty sure I need to use set_engine_par but that’s about as far as I’m getting : /
Maybe something with $EFFECT_TYPE_LOFI (for example)?
Any help in the right direction would be greatly appreciated
YummyBeats
(in reply to bodes)
Hard to tell with the little info. Most likely it’s an addressing issue which is most common. Getting the addressing right can be a bit tricky at first. It mainly depends on the level at which the effect is placed (group level, bus level, instrument level, etc.) and whether it is a send or insert effect. Fortunately, addressing is also explained in the set_engine_par article.
Let me know where you want to place the LOFI FX and I give you a short example code.
DottyBear
Hello,
Thanks for all these useful tuts!
I’m just starting out and I’ve searched through all your tutorials and I can’t find an answer to my question. Is it possible to change the color (hex color) of a text (ui_label)?
YummyBeats
(in reply to DottyBear)
Thx!
Unfortunately we can’t set a custom font color for the integrated fonts. But KSP provides a few color variations. Learn more:
https://blog.yummybeats.com/ksp-kontakt-scripting/kontakt-scripting-ksp-list-all-font-types-tool-for-kontakt-5/
However we can add custom fonts as bitmap which is not perfect but it works ok with more simple fonts like sans_serif. When creating this bitmap we can chose any color we want also rgba including the alpha channel.
Just use the font type generator at ksp.yummybeats.com
And also read this article: https://blog.yummybeats.com/ksp-kontakt-scripting/ksp-scripting-ni-kontakt-use-own-font-types-with-kontakt-6-via-custom-font-sprite/
I hope this helps.
Kontakt Scripting (KSP) – CUSTOM SCRIPTS :: advanced round robin function | YummyBeats Blog
[…] you may also wanna read the complex ui tutorial […]
Matt
Nevermind. Wasn’t thinking straight.
Matt
Hi there, I’ve been through the premium articles for this and macros but seeing as this doesn’t use macros I can’t figure out how to enable the required functions for each knob/slider. Any help would be appreciated
Thanks, it’s been a big help so far!
YummyBeats
(in reply to Matt)
Thx! I’m not sure if I got this right. In case you want to make all knobs functional you can read this article
If you just like to shorten your code and speed up your workflow with sublime 3 you can read this article
Macros themselves can rather be considered as helper or code factories. If you have lots of repeating code structures you can use them to “print out” those structures again and again. Thereby you can modify the “printed code” a little for example by declaring variables with different names etc. This all is explained in the working with macros article (which you already read, I guess).
I hope this still helps, although you said you got it already 🙂 If you got any further questions just let me know.
Matthew
(in reply to YummyBeats)
Thanks, as I said I was being a bit slow, had made a simple error. What I’m trying to figure out now is how to add and AHDSR to the home page. I have the code appearing and no complaints from the script editor. The only problem is the AHDSR is constantly showing. I’m trying to have it show on the main home page, and disappear when I hit the FX or about buttons. Is there a simple way of doing that?
YummyBeats
(in reply to Matthew)
Actually it should hide like shown in the demo video. How about the included nki?
This is already the easiest way I can imagine. However this tutorial is working directly without sublime 3 compiling so it seems to be more (complex) code then it would look like with sublime 3. I will send you a pm with some sublime 3 example code later on.
arminh
I bought premium part of article but it’s still dont work 🙂
YummyBeats
(in reply to arminh)
oh, what’s not working? Doesn’t it show up?
arminh
(in reply to YummyBeats)
I sent you email 🙂
arminh
How i can add sliders to main screen?
YummyBeats
(in reply to arminh)
via
declare ui_sliderit’s described in detail in the premium part of this article
Serge GORA
Hello _
The effect commands are not assigned in this Script (Lo-fi and filter SV LP4). There are the control buttons but they do not affect the parameters of the concerned effects.
The “on ui_control” part for these commands is absent.
For the resonace commande (Filter), the CONTROL_PAR_MOUSE_BEHAVIOUR is forgotten .
Best .
_ Serge _
YummyBeats
(in reply to Serge GORA)
yes, sorry, this is only about the visual functionality to not bloat the article any further “In this first part we only set up the GUI or the Navigation.”
If you want control over the Kontakt engine, refer to this article:
https://blog.yummybeats.com/ksp-kontakt-scripting/kontakt-scripting-ksp-sublime-3-how-to-work-with-macros-tutorial/
Thx for the hint, I will fix it. I hope you still were able to follow this article (since it is the same code for all knobs)
[EDIT:] There will also be a separate article about the on ui_control