
Kontakt Scripting (KSP) :: SCRIPTS :: Main Drag & Drop Script / Draggables for Kontakt 5 & 6+
Please accept YouTube cookies to play this video. By accepting you will be accessing content from YouTube, a service provided by an external third party.
If you accept this notice, your choice will be saved and the page will refresh.
this drag & drop script can be used to rearrange anything with Kontakt. With up to 16 draggable elements.
It can easily be customized by adjusting a few parameters like size, position, amount of draggable elements. The draggables can be skinned with custom images as well (see video).
All draggable positions are updated into an array which can be used to reorder anything with Kontakt. Read more below under API
Recommended
Sublime Text (if you want to work with the sublime short-syntax code, which is included in the DL)
Download all files to this article
- NKI file [Kontakt 5]: open script tab & resource container
- NKI file [Kontakt 6]: open script tab & resource container
- ksp script file for sublime text
- ksp script file for kontakt 5
- ksp script file for kontakt 6
DLC: additional CONTENT
(reARRANGE FX)
Version 2.0: Refined Code
Vertical & Horizontal Drag & Drop
License:
MIT International License.
https://blog.yummybeats.com/license-text-mit/
You may use this script, modify it, build upon it, as you like (also commercially), as long as you keep all credits within the code visible to others. You may put them into an extra open script tab or inside an about section of your instrument. If you would like to remove the credits or publish them somewhere else, please contact us
YOU MAY NOT commercialize, share, distribute, whatsoever the included image files and other media (© 2026 all rights reserved).
Content
-
important notes
-
DOCS :: SETUP GUIDE
-
DOCS :: adjustable vars
-
DOCS :: API / output data & usage
-
TUTORIAL :: Full Script
-
TUTORIAL :: on init explained (only relevant parts)
-
TUTORIAL :: on ui_control explained
Related
Important Notes
These docs explain the code on the basis of the Kontakt Script versions supplied with the download.
If you are working with sublime it is recommended to use the sublime version, also supplied with the download.
The sublime version works for both, Kontakt 5 & 6. Simply set the preferred Kontakt version at the top of the script, before compiling it.
For the draggables both the words “element” and “cursor” are used across these docs.
Setup Guide
- copy the whole code from inside the on init into your on init. It is best to place the code somewhere under yours.
But don’t copy the “on init” “end on” again - copy the whole code from below the on init somewhere below your on init.
- Put the copyright notice at the very top of your code (or into an extra open script tab or into an about section of your instrument).
See this demo:
{#####################################################################################
"YummyBeat's - KSP Drag & Drop" script, licensed under the MIT License
....
....
Please copy the whole copyright notice here!
#####################################################################################}

on init
  {### YOUR CODE ###}

  {YUMMYBEAT'S KSP DRAG & DROP SCRIPT}
end on

{### YOUR CODE ### }

{YUMMYBEAT'S KSP DRAG & DROP SCRIPT}
on ui_control (?dd_area)
  {.....}
end on
Adjustable Vars (Kontakt6 & Kontakt5)
{ SET GLOBAL UI }
  declare $UI_WIDTH 	:= 1000 {set UI width: min width = 632; max width = 1000 }
  declare $UI_HEIGHT 	:= 540 {set UI height: max height = 540 }
  declare @WALLPAPER
  @WALLPAPER 	:= "wp" {set background wallpaper (image name w/o file extension) }

{ SET DRAG & DROP AREA }
  declare const $NUM_CURSOR 	:= 8 {set the amount of total cursors; max = 16 }
  declare const $DD_AREA_WIDTH 	:= 480 {set the drop down area width }
  declare const $DD_AREA_HEIGHT 	:= 64 {set the drop down area height (this should equal the cursor image height) }
  declare const $DD_AREA_ALIGN 	:= 1 {align the drag & drop area: 1 = center; 0 = left }
  declare const $DD_AREA_POS_X 	:= 0 {left indent; set to 0 when align = center }
  declare const $DD_AREA_POS_Y 	:= 241 {position the drag & drop area vertically }
  declare $RELEASE_TIME		:= 200 {Kontakt 5 only: wait time until mouse release code is executed }

{ SET CURSOR IMAGES }
  declare !cursor_img[$NUM_CURSOR]
  !cursor_img[0] := "cursor_0"	{set individual image for cursor 1: enter image file name w/o file extension }
  !cursor_img[1] := "cursor_1"	{set individual image for cursor 2: enter image file name w/o file extension }
  !cursor_img[2] := "cursor_2"	{set individual image for cursor 3: enter image file name w/o file extension }
  !cursor_img[3] := "cursor_3"	{ ... }
  !cursor_img[4] := "cursor_4"
  !cursor_img[5] := "cursor_5"
  !cursor_img[6] := "cursor_6"
  !cursor_img[7] := "cursor_7"
  {
  !cursor_img[8] := 	""
  !cursor_img[9] := 	""
  !cursor_img[10] := 	""
  !cursor_img[11] := 	""
  !cursor_img[12] := 	""
  !cursor_img[13] := 	""
  !cursor_img[14] := 	""
  !cursor_img[15] := 	""
  }
  {uncomment if using more than 8 cursors}
simply refer to the comments nearby or watch the video.
API :: Output Data and Usage
$pos
holds the current position of the selected cursor
message($pos) //outputs 2
$this_cursor
holds the current selected cursor index
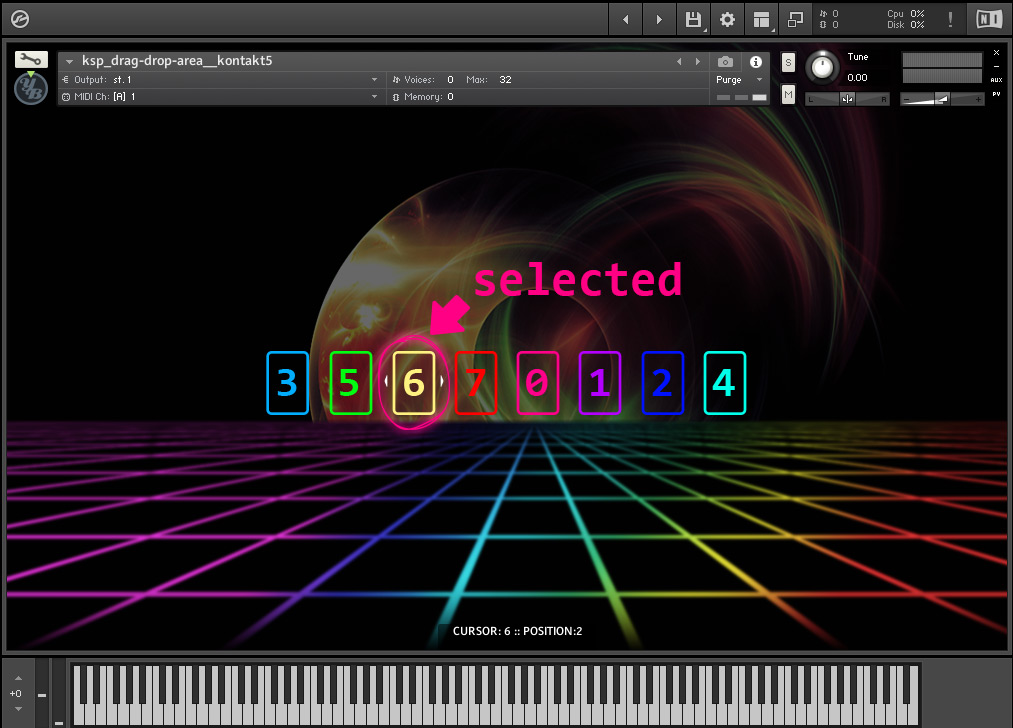
message($this_cursor) //outputs 6
%cursor_index
this array holds all cursor indices (the cursor IDs) subjected to their current positions. Where the array keys represent the positions and the values the cursor indices (see example below).
So if we wanna know which cursor is currently at which position we can do:
// THIS IS REFERRING TO THE CURSOR POSITIONS FROM THE IMAGE ABOVE

//position 0
  message(%cursor_index[0]) //outputs 3
//position 1
  message(%cursor_index[1]) //outputs 5
//position 2
  message(%cursor_index[2]) //outputs 6
//position 3
  message(%cursor_index[3]) //outputs 7
//position 4
  message(%cursor_index[4]) //outputs 0
//position 5
  message(%cursor_index[5]) //outputs 1
//position 6
  message(%cursor_index[6]) //outputs 2
//position 7
  message(%cursor_index[7]) //outputs 4
Example
All the values above will be updated whenever we move an element to a new position.
We can now use all the values to reorder anything we want.
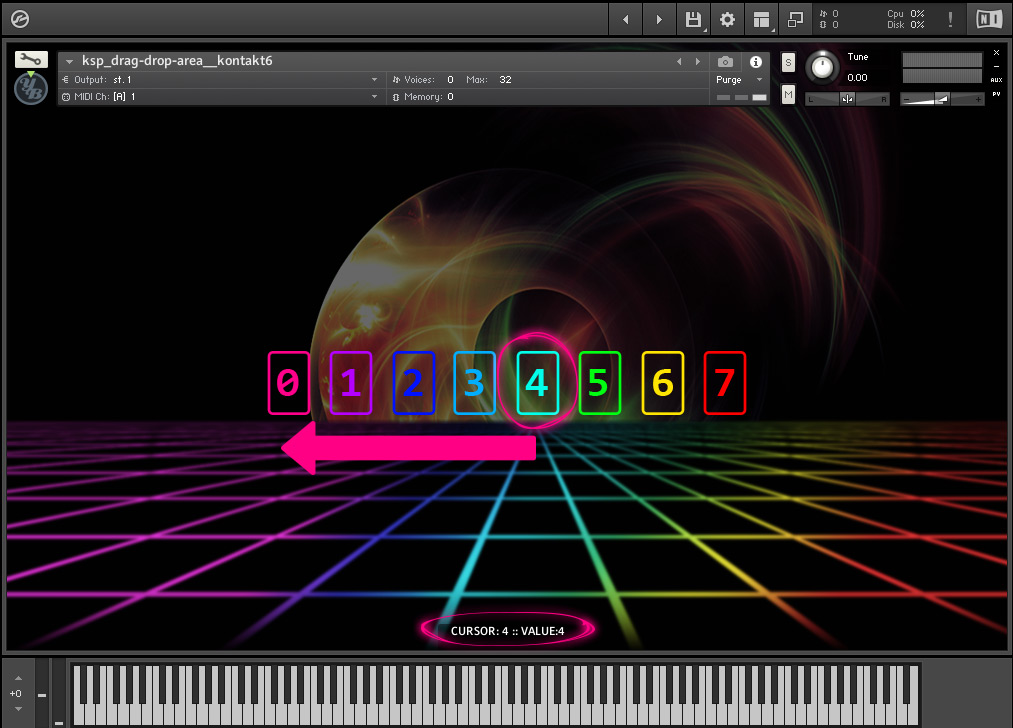
Let’s move element four to the first position = Null position.
$pos
is 0 (before it was 4)
$this_cursor
stays 4 until we select another cursor.
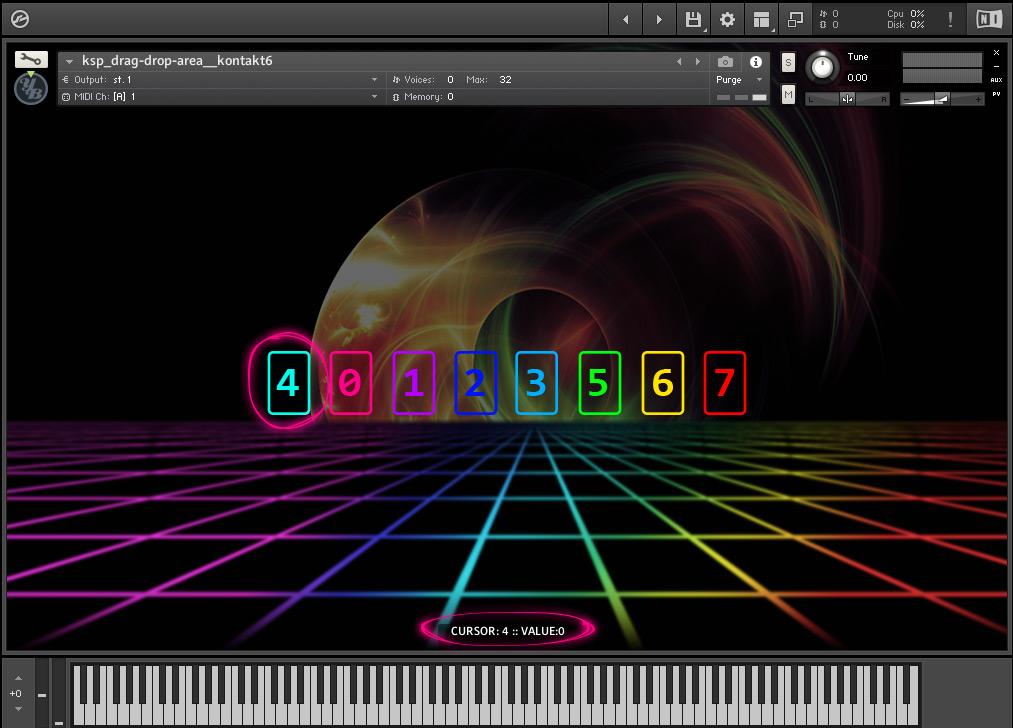
%cursor_index
looks like this now:
%cursor_index[0] => 4
%cursor_index[1] => 0
%cursor_index[2] => 1
%cursor_index[3] => 2
%cursor_index[4] => 3
%cursor_index[5] => 5
%cursor_index[6] => 6
%cursor_index[7] => 7
Now we can iterate through the %cursor_index array and use its keys & values to reorder anything we want (see rearranging fx slots)
premium content


HarryG
Hi, is it possible to show/hide panel when we click on a cursor ? And is it possible to have a switch and a menu directly on the cursor to bypass/change fx of the selected cursor ? So we can have 8 cursors but let the user choose between every kontakt fx possible with a menu that displays all the kontakt’s FX, and bypass it via a switch ? Thanks !
YummyBeats
(in reply to HarryG)
Hey,
yes it is possible to show hide a panel when clicking on a cursor. Actually I just updated the current version 2 and added a new on click function.
If you are using vanilla ksp simply add your code directly before the {MOUSE RELEASE EVENT} within the on ui_control (?dd_area) callback. For example if you want to show the controls of the selected FX you can do something like:
set_control_par(%fxPanel_uID[$dd_cursor_pos], $CONTROL_PAR_HIDE, $HIDE_PART_NOTHING)If you want to display an additional menu with all the FX to chose from simply add another:
set_control_par($showALLFXPanel, $CONTROL_PAR_HIDE, $HIDE_PART_NOTHING)However you need to create a logic and update %fxPanel_uID with the new added FX then. But this is getting too complicated
I really recommend using the new function version for sublime. Vanilla KSP is getting tough here. You can get it from https://blog.yummybeats.com/ksp-kontakt-scripting/kontakt-scripting-ksp-scripts-vertical-horizontal-drag-n-drop-v2-docs
Daniel Bastion
Is it at all possible to set up this kind of system but have the draggables be *vertical* instead? I imagine you could change the even-counting formulas to count odd values instead, to represent the y values of each index. So for example instead of doing $i *2, you could do $i * 2 + 1, which would count 1, 3, 5, 7, etc. (you would still need to manually set the first index to 0, since counting this way cannot include 0).
Would that work though? It seems like the rest of the structure of the code would apply as long as the cursor index is always only counting odd (y) values instead of even (x). Would love to know what you think as I would love to use this script and tweak it so I can create a vertical draggable, with 0 being at the bottom and 1 being at the top. Thanks so much!!!!
YummyBeats
(in reply to Daniel Bastion)
Yes in general it should be possible.
Your assumption (taking the odd indices) is correct, but unfortunately it’s still not that easy.
The entire collision logic needs to be revised. I’ll take a look at this, but I can’t make any promises at the moment.
Daniel Bastion
(in reply to YummyBeats)
I spent some time going through it and it actually turned out to be very simple since your code was already so precise with counting and tracking cursor position relevant to the dd_area index. Since initially %cursor_index[0] would match with the y coordinate of 1 (?dd_area[1]) all you have to do is change ?dd_area[$this_cursor*2] to ?dd_area[$this_cursor*2+1] wherever it is used in the on ui_control code.
Same for the on init, in the section called “evenly spread cursors in the range from 0 to 1” all I had to do was update the dd_area formula so it looks like this:
{REMOVED}
Beyond that the only other thing I did was make new images that weren't quite as tall so they would fit in the vertical perfview, I swapped the $DD_AREA_WIDTH and $DD_AREA_HEIGHT values so $DD_AREA_WIDTH = 64 and $DD_AREA_HEIGHT = 480 and had to adjust the $DD_AREA_POS_Y a bit.
Beyond that that's literally all I changed and it works PERFECTLY. It's quite elegant since your code initially was so careful to track cursor index relevant to this_cursor and pos, so by just shifting the dd_area index up 1 it works perfectly on the y axis! Thanks again and if you wanted to update the article with this info feel free to!
YummyBeats
(in reply to Daniel Bastion)
Thx for that. I just finished updating the script as well and sent you a PM 🙂
@all No worries it will be released in the near future
Kael
Is there a way to make the last selected cursor persistent? No matter what I try it always refreshes back to Cursor 1 (2nd index).
YummyBeats
(in reply to Kael)
Depending on what you would like to achieve, you can either just add
make_persistent($this_cursor)somewhere afterdeclare $this_cursor.However
$this_curservalue will only remain stored when you save your nki or create a snapshot etc. When closing your instrument without saving it$this_cursorwill fall back to its default value again in the next session.Or if you’d like to keep
$this_curserwithout saving your instrument manually you can work with external arrays. You can store$this_cursoror the whole%cursor_indexarray into an external array (nka) automatically viasave_array(). You can then fetch it again automatically viaload_array()e.g.on initoron persistence_changedand then useon async_completeto work with the fetched valuesDaniel Bastion
(in reply to YummyBeats)
Is there any chance you could write a quick demo on how to do this? I know how to use save_array and load_array in general but not sure *where* in the code this needs to be called (most examples of save/load array use an actual save and load button, and mode 0). Since we would want this to happen asynchronously and without using a save and load button, I imagine we would want to use mode 1 but where in the code should we call for save and load?
YummyBeats
(in reply to Daniel Bastion)
A load/save button is not required since the save_array command works inside any on ui_control.
So assuming you are on Kontakt 6 or above you can put the save_array() command into the on ui_control (?dd_area) after if($NI_MOUSE_EVENT_TYPE = $NI_MOUSE_EVENT_TYPE_LEFT_BUTTON_UP)… after {MAGNET}:
{MAGNET}
$save_array_id := save_array(%cursor_index,1)
You can for example load the stored array (nka) inside the on init…
…and use the on async_complete to handle your stored and fetched array values like so:
on async_complete
  	if ($NI_ASYNC_ID = $load_array_id)
		$load_array_id := -1
		message("array values fetched:" & %cursor_index[0] & "," & %cursor_index[1] & "," & %cursor_index[2])
		{DO SOMETHING}
  	end if
  	if ($NI_ASYNC_ID = $save_array_id)
  		$save_array_id := -1
  		message("array values stored")
  		{DO SOMETHING}
  	end if
end on
Note: the load_array overwrites the %cursor_index so you can just work with it.
Also note: when using %cursor_index the on init needs to be adjusted because in the original script the %cursor_index gets defined there which will overwrite %cursor_index again before the on async_complete is called. So in the on async_complete %cursor_index[0] is 0 again, %cursor_index[1] is always 1, and so on.
I hope that helps
Mike
Hi again sorry for all the messages!
One problem is when an effect gets modified (eg. compression threshold) it reverts back to default value when re-ordering the FX chain. I can only assume there is code missing to store / retrieve the different FX values when function reorder_fx_slots is run? Any help much appreciated thanks again.
YummyBeats
(in reply to Mike)
Yes that’s right, you can save your settings e.g. in a %array. You could even store the array externally via save_array(), to load it again as an fx preset. Or you can also make an internal array persistent via make_persistent(%array), so that the settings are still available in the next session.
You would need to assign an array key for each single fx parameter that you want to memorize. Store every current fx value into the correct key with each fx parameter change via on ui_control
EDIT: another approach: if you have created separate ui elements for each fx parameter (like buttons / knobs / tables / etc), you can simply fetch the data from this related ui element without using an array. This also works when the ui element is currently hidden.
Mike
Hi, I have installed the scripting via Sublime which is all working well (please ignore my previous message on Sublime install difficulties!).
Except the script now causes my instrument to crash occasionally. Would there be any reason for this?
Thanks.
YummyBeats
(in reply to Mike)
Great that you got it running.
Another tip for all windows users: there is also a portable version of sublime text. This version is easier to handle also when it comes to updates.
Does Kontakt crash completely or do you get an error message in the script tab when you press the apply button?
A complete crash actually happens very rarely and honestly I have too little experience. It could even have something to do with your hardware (audio interface, ram etc).
If you have the option, try to install kontakt on another device and test your script there.
If it’s the script itself, it’s extremely difficult to tell what causes the problem, if you don’t get an error message. I can only think of classic debugging. So comment out your code, block by block and line by line, until you have found the error.
I hope this helps.
EDIT: Did you use a few thousand lines of code inside the on init? That could also cause problems. Learn more in this parser stack overflow article
Mike
(in reply to YummyBeats)
Thanks for your quick replies! It crashes Logic immediately when I update the script / initialise the instrument (not all the time though)..I disabled my other script slots so cannot be their large init code..will keep trying! Thanks for the code though, works great.
YummyBeats
(in reply to Mike)
You’re welcome. Is the cpu / disk performance at max before it crashes? I once had similar problems when I tried to store large amounts of data in an external array (including FX, modulation and EG settings). In the end I gave up on this concept and had to split the data over several storing operations. My DAW & Kontakt didn’t crash, though. It just completely froze at max CPU load.
Speaking of which, I can think of another way to retrieve your fx settings after you have switched the fx slots. If you have created separate ui elements for each fx parameter (like buttons / knobs / tables / etc), you can simply fetch the data from the related ui element without using an array. This saves a lot of time, frustration and code. This also works when the ui element is currently hidden.
Serge
Hi _
Please, how to show different controls after click ont the differents cursors ?
This would be to bring up the effects parameters corresponding to each cursor, for example.
Regards _
YummyBeats
(in reply to Serge)
Hey, good point.
maybe we could call a function inside the ddarea’s on ui_control.
Via
$this_cursorinside that function we can show the corresponding fx controls. Or hide all the other fx controls again.If you are already coding for kontakt 6 you could just show a whole panel which you have especially created for the single fx controls
I wasn’t able to test this yet, though. I’m not sure right now if the on ui_control (or the function inside) already gets executed when only clicking on one of the cursors or if it requieres a curser movement.
Let me know. If it works I could write another article.
Serge GORA
(in reply to YummyBeats)
ah sorry, I couldn’t manage to execute that: a sequel to this article would be much appreciated .
Best _
_ Serge
YummyBeats
(in reply to Serge GORA)
can you put the following function at the end of the on ui_control (?dd_area) like so:
on ui_control (?dd_area)
  //...
  call fire
end on

	function fire
		message("active element:" & $this_cursor)
		wait(2*1000*1000)
		message("")
	end function
I hope you already get the point.
I can also write a detailed sequel, but it will take some time.