
Animations via image sprite sheet let your Kontakt instruments feel more organic and vivid. Sprite sheets can also be used for displaying dynamic info like note names or other information. This article is kept simple for a better understanding. The download contains a more advanced version of an oscilloscope, reacting on note height & velocity, easing out on note release, and displaying the note numbers (see video)
Please accept YouTube cookies to play this video. By accepting you will be accessing content from YouTube, a service provided by an external third party.
If you accept this notice, your choice will be saved and the page will refresh.
Content
-
create animation
-
create spritesheet
-
ksp script: the whole code
-
on init
-
animation function
-
on note
-
on release
Download all files to this tutorial premium
- advanced script
(displaying note names, reacting on note height & velocity and easing out) - NKI file: open script tab
- open resource container (access all png files)
- full ksp script for sublime text with helpful comments
- Sublime Text required
License:
KSP Scripts licensed under Creative Commons Attribution 4.0 International License.http://creativecommons.org/licenses/by/4.0/ You may use the scripts, modify them, build up on them, as you like (even commercially), as long as you keep all credits inside the scripts. If you would like to remove the credits or publish them somewhere else, please contact us
You may not commercialize, share, distribute, whatsoever the included image files and other media (© all rights reserved).
Recommended Tools
- 3D tool like blender to create an animated png sequence
(you can also use Knobman for simple animations like VU-Meters or LED arrays) - Texture Packer for creating png sprites from image pool
or glueIT (Free Tool)
Required
animation sequence
Here you can read how to export a png sequence in blender
If your animation software can export a full sprite sheet you can already output the sprites (with the sprites aligned horizontal or vertical) and just skip the next part.
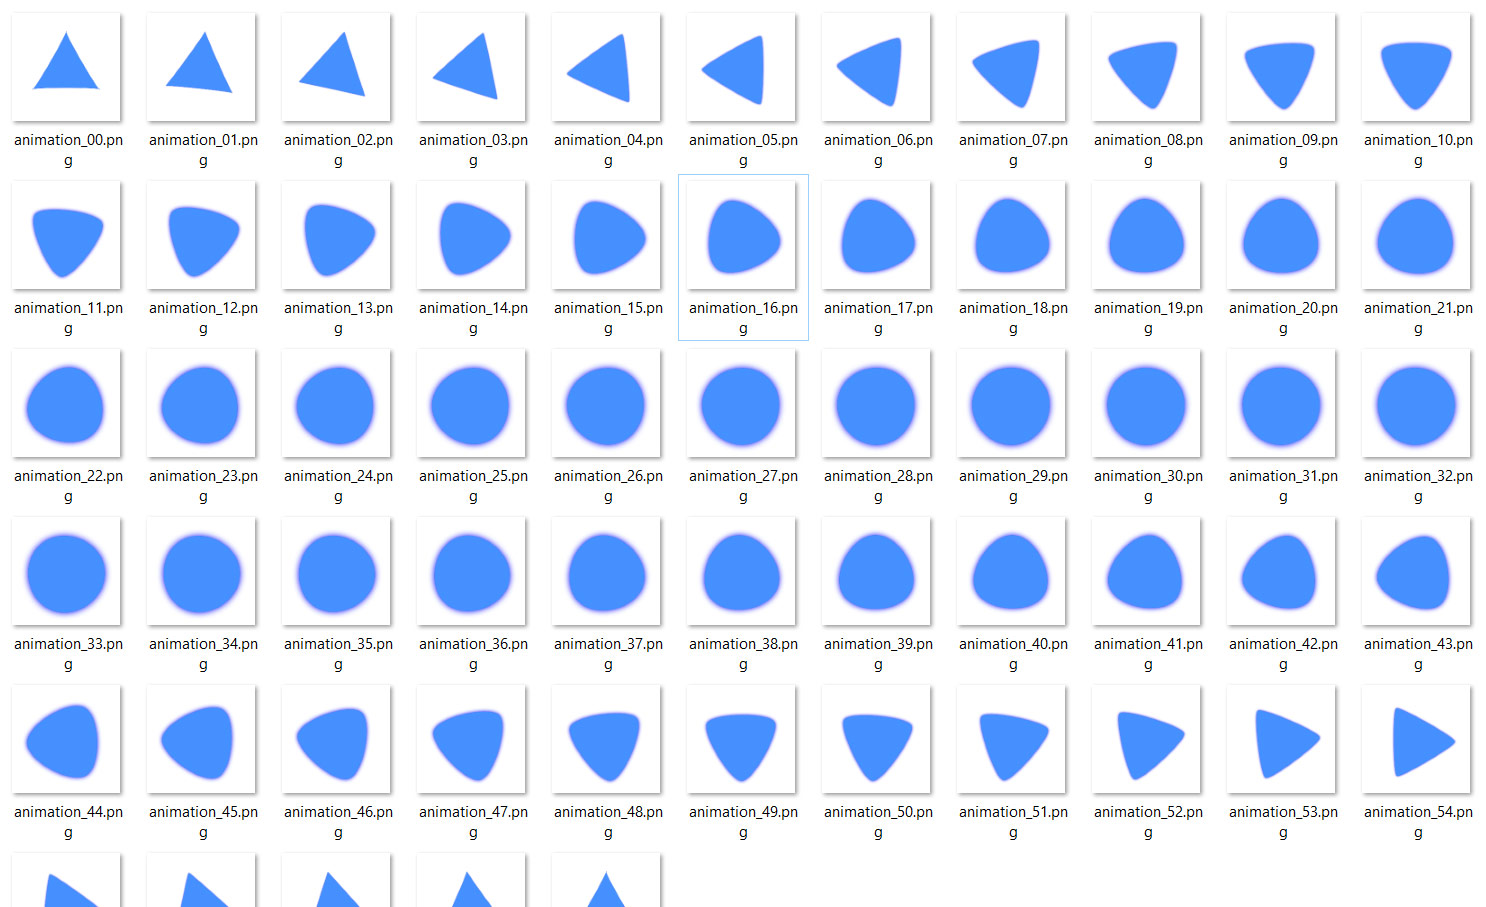
the sprite sheet
We now have to create a sprite sheet out of all the png images. So that Kontakt can use it to run the animation. To do so we have to merge all the 60 png files into a single png file and einher arrange them horizontally or vertically (like shown in the image below). This can either be done with a regular grafic Tool (and lots of work) or via a sprite sheet generator like glueit (see below)
What’s a sprite sheet? Just watch this video
glueIT (Free Tool)
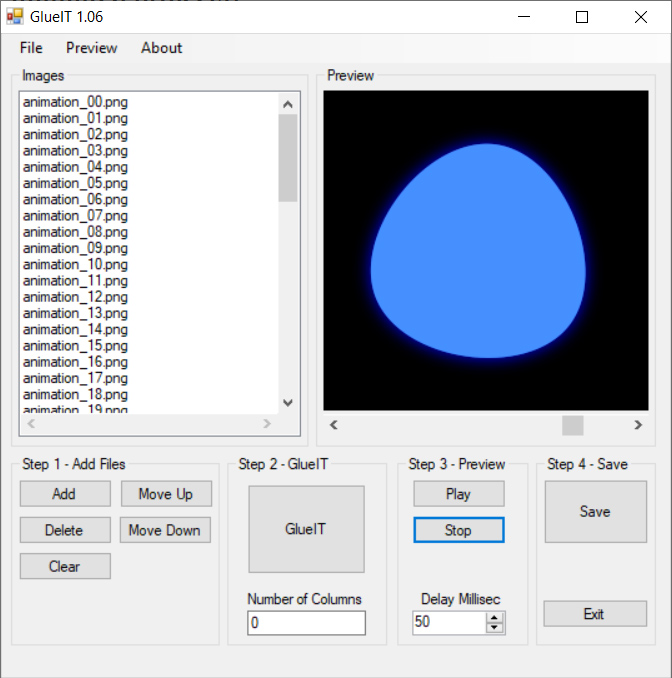
https://github.com/Kavex/GlueIT
- Simply add your images
- set columns to “0”
- press “glueIT”
- save your sprite
Your sprite should look like this:

KSP Script
First of copy your sprite sheet into the Resources/pictures folder and set the text file like this. You can use this sprite sheet for testing if you like.
Has Alpha Channel: yes
Number of Animations: 60
Horizontal Animation: yes
Vertical Resizable: no
Horizontal Resizable: no
Fixed Top: 0
Fixed Bottom: 0
Fixed Left: 0
Fixed Right: 0
The Full KSP Script (for Sublime Text)
The following script does an animation using our sprite sheet above, whenever a note is played. We can also set a frame rate (=> animation speed).
For your better understanding the script has been simplified compared to what you see int the video Also to give a basic starting point so that you can add your own code. With the full script the animation reacts on note heights and velocity. Furthermore the played note names are displayed.
on init
  // set constants
    declare const $UI_HEIGHT := 312
    declare const $ANIMATION_FRAMES := 60 //total frame number of our animation (number of sprites)
    declare const $FRAMERATE := 30 //fps => higher = faster animation

  // global vars
    declare $frame_idx //holds current frame index
    declare $playing //used to prevent animation from being stacked
    declare $wait //used to define animation speed according to given frame rate
    declare $run //runs animation when any note is held or stops it when all notes released

  // calcualate animation speed
    $wait := 1000*1000 / $FRAMERATE // => convert micro seconds to seconds and divide by frame rate

  // UI
    // animation container : label
      declare ui_label $animation(1,1)
      $animation -> text := ""
      $animation -> picture := "animation_noteon"
      $animation -> picture_state := 0
      $animation -> width := 180
      $animation -> height := 180
      $animation -> pos_x := 226
      $animation -> pos_y := 40

    // ui & script tab
      set_script_title("animation")
      set_control_par_str($INST_ICON_ID,$CONTROL_PAR_PICTURE,"yb_ico")
      set_ui_height_px($UI_HEIGHT)
      set_control_par_str($INST_WALLPAPER_ID,$CONTROL_PAR_PICTURE,"bg_init")
      make_perfview
  message("")
end on

on note
  //run animation
    $run := 1 //run when note played
    if($playing = 0) //but only when no animation is currently running
      call animation
    end if
end on


on release
  if (search(%KEY_DOWN,1) = -1) //checks if any note is still held
    $run := 0 //stop animation
  end if
end on


function animation
  // do endless loop, while allowed
    while($run = 1)
      $playing := 1 // set animation playing state (1 = currently playing)
      $animation -> picture_state := $frame_idx //increasing picture state and roll the animation

      inc($frame_idx)
      wait($wait) //simulates the framerate (30 fps) otherwise it's 1.000.000 fps (or one frame per micro second)

      // loop - restarts animation again
        if($frame_idx >= $ANIMATION_FRAMES)
          $frame_idx := 0
        end if
    end while

  //reset animation status when stopped so that it can be started again
    if ($run = 0)
      $playing := 0
    end if
end function
On init – Callback
we skip the explanation for declaring all the basic variables & stuff (just read the nearby comments or read the other articles).
  // calcualte animation speed
        $wait := 1000*1000 / $FRAMERATE // => convert micro seconds to seconds and divide by frame rate
For the animation we need to set a wait() command inside the animation function to simulate a certain frame rate. Without any wait() the animation would run with 1.000.000 FPS. So we wouldn’t notice any animation at all or we would have to create 1.000.000 pictures .. for each second 🙂 Don’t worry the animation function will be explained in detail below.
$wait := 1000*1000 / $FRAMERATE
In Kontakt the basic time unit for the wait() command is micro seconds. So we need to convert everything to seconds (1000 * 1000) and divide it by our given frame rate (which is 30 fps). That gives us a waiting period of 33.333 micro seconds.
Container (ui label) for the sprite sheet
// animation container : label
    declare ui_label $animation(1,1)
    $animation -> text := ""
    $animation -> picture := "animation_noteon"
    $animation -> picture_state := 0
    $animation -> width := 180
    $animation -> height := 180
    $animation -> pos_x := 226
    $animation -> pos_y := 40
declare ui_label $animation(1,1)
This creates the label which will be the “container” for our animation. We can only use control_par_picture_state with labels, value edits or tables.
Note: you can also use a slider instead of a label and change the slider’s value instead of using picture_state. There are nice tutorials about that. But labels are more practical since you can use them as background and overlay them again with (transparent) buttons, sliders, etc. Furthermore labels can not be controlled by mouse events.
$animation -> picture := "animation_noteon"
assigns our sprite image to the label
In KSP raw code this line gets: set_control_par_str($CONTROL_PAR_PICTURE,"animation_noteon")
$animation -> picture_state := 0
sets the initial sprite. One sprite represents one frame.
in the KSP raw code this line gets: set_control_par($CONTROL_PAR_PICTURE_STATE,0)

$animation -> width := 180
we only set the sizes of one sprite not of the whole sprite sheet. So the width is 180 px not 10.800 px. But actually this isn’t necessarily required anyway!
in the KSP raw code this line gets: set_control_par($CONTROL_PAR_WIDTH,180)
animation function
function animation
  // do endless loop, as long as allowed
    while($run = 1)
      $playing := 1 // set animation playing state (1 = currently playing)
      $animation -> picture_state := $frame_idx //increasing picture state and roll the animation

      inc($frame_idx) //increases the frame index for the next loop pass
      wait($wait) //simulates the frame rate (30 fps) otherwise it's 1.000.000 fps (one frame per micro second)

      // loop - restarts animation again
        if($frame_idx >= $ANIMATION_FRAMES)
          $frame_idx := 0
        end if
    end while

  //reset animation status when stopped so that it can be started again
    if ($run = 0)
      $playing := 0
    end if
end function
while($run = 1)...end while
endlessly running unless $run is set to 0 somewhere else.
$playing := 1
animation state (1 = animation currently running). Prevents the animations from being stacked when new notes are played while the animation is still running. Explained later
$animation -> picture_state := $frame_idx
this actually rolls the animation and “renders” the frame by showing the corresponding sprite. So it just swaps the visible sprite each loop pass.
inc($frame_idx)
once the frame is “rendered” we can move to the next frame index
wait($wait)
as already explained above we have to set a wait command to slow down the while loop to get an animation of 30fps (read about the time conversion above)
$wait = 33.333 micro seconds to “slow down” the animation speed from 1.000.000 fps to in our case 30fps.
if($frame_idx >= $ANIMATION_FRAMES) ... end if
when we have reached the last picture state or the last sprite of our sprite sheet we need to reset the frame index so that the animation starts from frame 0 again. This loops the animation otherwise it would stick on the last frame forever. Furthermore $frame_idx would get bigger and bigger.
if ($run = 0) ... end if when $run= 0 no note is held anymore and the animation has stopped. We lastly need to set the animation status to 0 ($playing = 0) which allows to start the animation again when a new note is played.
on note – callback
on note
  //run animation
    $run := 1 //run when note played
    if($playing = 0) //but only when no animation is currently running
      call animation
    end if
end on
$run := 1
on every note played (no matter what) we allow the animation to get started
if($playing = 0) ... end if
but only if no other animation is already running. (otherwise the animations would kind of stack on each other which looks glitchy)
call animation
simply calls the animation and loops it as long as $run stays 1
on release – callback
on release
  if (search(%KEY_DOWN,1) = -1) //checks if any note is still held
    $run := 0 //stop animation
  end if
end on
%KEY_DOWN[<note_number>]
a Kontakt internal array. It contains the state of all keys. For example if we hit C3: %KEY_DOWN[60] = 0 otherwise it would be -1
if (search(%KEY_DOWN,1) = -1)... end if
check if really all notes are released. If so we set $run to 0 which immediately stops the animation loop
Daniel Lautersztain
This lesson has been so helpful!!! I'm utilizing the "ease in/out" code in my project and it works perfectly. I had two questions though:
1) I have my animation hidden then upon the on note I do a $HIDE_PART_NOTHING to reveal it (and hide it again on release) but is there a way to have labels/animations fade it so it isn't popping up abruptly? I wouldn't want to do this in the sprite itself since it loops seamlessly. Not sure if KSP can do like fade in out with transparency somehow.
2) I made my sprite to loop seamlessly so I was hoping that instead restarting the animation from frame 1 after on release that it could actually start on the last frame it was on. Can I do this with $frame_idx maybe?
Thanks!!!
YummyBeats
Thx I'm very happy that the tutorials are so helpful.
1) good questions I've been thinking a lot lately about creating a fade function. But unfortunately I think this can't be done by code. We would actually have to create a fade animation via image sprite itself, like from 0 opacity to 100% opacity. As you can imagine doing this for every single element you want to fade, it can be a pain in the ass. Furthermore it only works for tables, value edits and labels. But if you still wanna try, just use
$CONTROL_PAR_PICTURE_STATEas described here.Fading in/out an animation is pretty hard to realize. You would even have to take it a step further and create a matrix. For each animation step you would need to create opacity steps . Let's say you have an animation of 50 frames and make 20 opacity steps for each animation step (from 0 to 100% opacity). In total you would need to create 1000 frames. So when rolling the animation you then need to skip the opacity steps and take each 19th frame to roll the animation and take any 0th to 19th frame to roll the fade. I hope I was able to explain this clearly?!
2) Ah I see the simple function already works like that. for the advanced ease in/out animation simply remove $i:=0 within "function animation" That should do it. You can even add
make_persistent($i)into the on init afterdeclare $i. I don't know if this all destroys the ease effect though. Just let me know if this is the case and I'll take a closer look.carlos
Where is the demo?YummyBeats
You mean the full ksp script, shown in the video? You get it with the premium download above.