
Kontakt Scripting (KSP) :: set own font types – since Kontakt 6 via custom bitmap font sprites
Since Kontakt 6 we can add custom fonts. Although the ksp coding part is very easy, creating such a bitmap font manually can be a pain in the ass. That’s why we built an online ksp font type generator (currently not working).
Please accept YouTube cookies to play this video. By accepting you will be accessing content from YouTube, a service provided by an external third party.
If you accept this notice, your choice will be saved and the page will refresh.
If you still want to do it manually: the font or each glyph has to be converted into a special bitmap. In this case it’s a horizontal image sprite that has to be put into the Resources/pictures folder of your instrument. learn more below
CONTENT
-
creating the font BITMAP
-
Loading A CUSTOM FONT via KSP Script
-
OWN-FONT-TYPEs (OFT) DISPLAY TOOL – KSP
-
ONLINE KSP-FONT-TYPE GENERATOR
Creating the Font BITMAP
The best is to use our font type generator.
Simply load the bitmap into the Resources/pictures folder then.
Text File
Don’t forget to add a txt file into the Resources/pictures folder as well, with the same file name of your font sprite. Without it, the font would still work, but it would not be added to your resources container (.nkr) when creating or updating it.The content of the text file doesn’t matter. It can also be an empty txt.
This is how a font BITMAP looks like:
![]()
DIY :: Definitions & hints:
If you still want to create the bitmap yourself, you must strictly follow these definitions:
- the bitmap must contain exactly 256 red pixel dots in total
[These dots tell Kontakt where a new glyph starts] - the dots must be single pixels
- each dot represents a character.
[Or a control like delete, enter, shift (first 33 dots) or the space bar (34th dot)] - cropping, blurring or modifying any of the red dots will damage the font
- the dots must be 100% red (#FF0000)
- the position of each glyph is defined by the Windows-1252 standard
[glyphs can be left out, but the remaining glyphs must be at the correct position again. Never omit any of the red pixels] - don’t leave any space between unoccupied glyph-positions (or red pixels)
- don’t leave any space between the first controller pixels (first 33 dots)
font sizing is not possible within Kontakt. That has to be done before, when creating the bitmap font.
Kerning is not feasible with this bitmap method. So letter spacing may look slightly different compared to the original font.
Also keep in mind Kontakt bitmap fonts are pixel-based images (not vector-based). Thus the glyphs may look more blurred or biased than the original font.
Loading the bitmap FONT INTO KONTAKT – via KSP Script
Finally we can load the new font into Kontakt via the new $CONTROL_PAR_FONT_TYPE and get_font_id()
Custom fonts can only be used with dynamic text elements though, like labels, buttons, text edits etc.
For controls like buttons, switches and menus we can also set separate fonts for each event state. So we can do:
- button/menu OFF: font 1
- button/menu ON: font 2
- button/menu PRESSED: font 3
- and so on..
Use these control parameters:
$CONTROL_PAR_FONT_TYPE {OFF STATE}
$CONTROL_PAR_FONT_TYPE_ON
$CONTROL_PAR_FONT_TYPE_OFF_PRESSED
$CONTROL_PAR_FONT_TYPE_ON_PRESSED
$CONTROL_PAR_FONT_TYPE_OFF_HOVER
$CONTROL_PAR_FONT_TYPE_ON_HOVER
Adding a custom font to an UI_element
declare ui_label $label (1,1)
We first create a new ui element with dynamic text elements like a label, button, text edit,…
declare $fontID
$fontID := get_font_id("myFont")

{OR MULTIPLE IDs VIA ARRAY}
declare %fontID[4]
%fontID[0] := get_font_id("myFont_1")
%fontID[1] := get_font_id("myFont_2")
%fontID[2] := get_font_id("myFont_3")
%fontID[3] := get_font_id("myFont_4")
Then we need to retrieve the font ID of our font sprite via get_font_id()
Instead of “myFont_” use the filename of your font sprite
We can also use multiple fonts within one instrument. Simply add more $fontIDs or use an array like %fontID[]
set_control_par(get_ui_id($label),$CONTROL_PAR_FONT_TYPE,$fontID)

//or via array
set_control_par(get_ui_id($label),$CONTROL_PAR_FONT_TYPE,%fontID[0])
Then we assign the font ID to our ui_element
Example Label:
on init
  declare ui_label $label (1,1)

  declare $fontID
  $fontID := get_font_id("myFont_1")

  set_control_par(get_ui_id($label),$CONTROL_PAR_FONT_TYPE,$fontID)
end on
Example Text Edit:
on init
  declare ui_text_edit @textEdit

  declare $fontID
  $fontID := get_font_id("myFont_2")

  set_control_par(get_ui_id(@textEdit),$CONTROL_PAR_FONT_TYPE,$fontID)
end on
Example button:
on init
  declare ui_switch $button

  declare %fontID[6]
  %fontID[0] := get_font_ID("myFont_1")
  %fontID[1] := get_font_ID("myFont_2")
  %fontID[2] := get_font_ID("myFont_3")
  %fontID[3] := get_font_ID("myFont_4")
  %fontID[4] := get_font_ID("myFont_5")
  %fontID[5] := get_font_ID("myFont_6")


  set_control_par(get_ui_id($button),$CONTROL_PAR_FONT_TYPE,%fontID[0]) 		{ OFF STATE }
  set_control_par(get_ui_id($button),$CONTROL_PAR_FONT_TYPE_ON,%fontID[1]) 	{ ON STATE }
  set_control_par(get_ui_id($button),$CONTROL_PAR_FONT_TYPE_OFF_PRESSED,%fontID[2])
  set_control_par(get_ui_id($button),$CONTROL_PAR_FONT_TYPE_ON_PRESSED,%fontID[3])
  set_control_par(get_ui_id($button),$CONTROL_PAR_FONT_TYPE_OFF_HOVER,%fontID[4])
  set_control_par(get_ui_id($button),$CONTROL_PAR_FONT_TYPE_ON_HOVER,%fontID[5])
end on
OWN-FONT-TYPES (OFT) DISPLAY TOOL
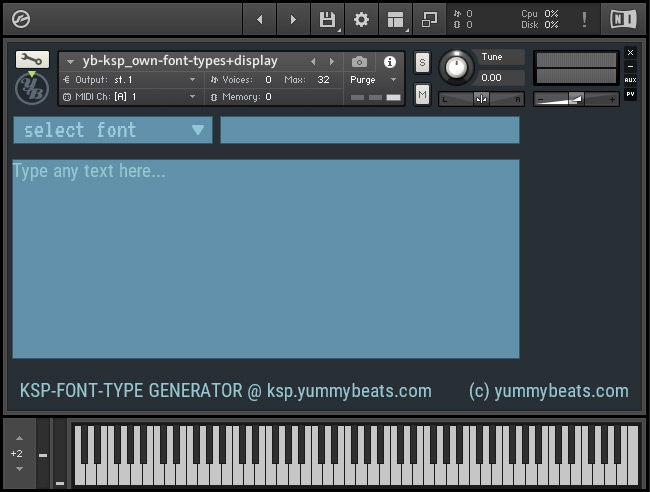 This tool is just a little helper which lets you quickly check if your own fonts are working well and how they look & feel inside Kontakt.
For this go into its Resources/pictures folder and overwrite font_1.png; font_2.png or font_3.png with your font sprite.
Open the yb-ksp_own-font-type+display.nki with Kontakt 6 (or up) and select your updated font(s).
Note: to apply a new font you should really completely close and restart Kontakt after updating one of the font-sprite PNGs. Because only hitting the apply button inside the script tabs may cause font glitches.
However: if there are still glitches after restarting Kontakt, there is most likely an error with the font sprite itself.
Sometimes a fancy font or a very small font size just doesn’t work:
- Try to adjust the letter spacing then.
- Or the line height if one of the glyphs has overlapped the red dots.


CC
I tried about 15 different combinations of fonts from your site. All of them are garbled in your NKI. What’s the deal?
I have the letters between the lines and not touching the top. Exported from YOUR fonts on your site maker. The all come up weird. I’ve restarted K7 and still nothing.
YummyBeats
(in reply to CC)
Sounds like the typical kerning issue with bitmap fonts as described in the article. Have you already tried playing around with letter spacing? Especially with serif and design fonts there is a high potential of overlapping some of the serifs resulting in creating the glitches. So sans serif fonts are easier to handle.
To make sure it is the kerning issue and not kontakt or the font generator itself, try the provided font in this article, made with the generator. Just right click on the font image above and download the png. This font should work without glitches.
AM
This is great, thanks! Is there a way to change the size of the font?
YummyBeats
(in reply to AM)
Thx, yes but unfortunately not in the way you are used to from regular Fonts.
So all sizes (and styles) have to be created first (e.g. with the Font Generator).
Then you can create an array with the different sizes (and styles) as described in this article
Serge
OK; many thanks for your quick answer .
So, we keep the text file _
Serge
Hi _
I made some personal font images and inserted them in the correct folder for KONTAKT 6 (Resources / pictures folder).
No need to add a .txt file to them.
Regards _
YummyBeats
(in reply to Serge)
oh that’s cool. Thanks for that.
The article has been edited
[EDIT] just noticed that you still need a text file for creating the resources container.
So that the font image also gets stored into your .nkr
The content of the text file doesn’t really matter though. It can also be an empty text file.