
Kontakt Scripting (KSP) :: Sublime Text – how to work with macros, tutorial
in this tutorial we will work with sublime text and macros. A macro works almost like a function. We use them like functions and we can use arguments to pass expressions to alter or individualize several parameters inside a macro.
In the second part of this article we build a small synth with one FX using several kind of macros to create 4 fully functional knob units.
Download all files to this tutorial
- working synth with a nice retro lead (sampled)
- Open Resource Container: all image files
- NKI & KSP file: the working script
Please accept YouTube cookies to play this video. By accepting you will be accessing content from YouTube, a service provided by an external third party.
If you accept this notice, your choice will be saved and the page will refresh.
1. Content
-
introduction
-
What’s a macro?
-
macro basics (how macros work)
-
advanced macro handling [premium]
-
example macro for a knob unit [premium]
-
example macro for an ui_control [premium]
-
The Full Script [premium]
Note: all the code below doesn’t work if you put it into Kontakt as is. It needs to be compiled with sublime first (use F5 key)!
1. Introduction
 first we learn how macros basically work and in the second part (premium) we use them to create a fully functional line of knobs to control a FX. Each knob will be framed by 2 labels (above and below) holding the knobs name and the knob’s values. Another macro will be used for the “on ui_control” callback.
2. What’s a Macro?
As said above, macros are similar to functions in the way we use them. We can declare them once and execute them multiple times anywhere we want. We can also use arguments to pass expressions (like varibales, arrays, values etc). Those expressions can be used to alter or individualize the code inside a macro.
But instead of returning any values or executing any code, a macro is just “printing” the whole code from inside it, whenever and wherever it gets called.
So we can use macros like factories to even create other functions, callbacks or any other code fragments. Preferably whenever we have repetitive code patterns so that we don’t have to write those patterns again and again.
Macros can only be used with Sublime Text with the KSP plugin installed (learn more).
3. macro basics
First open and “prepare” Sublime if you haven’t done yet. Learn more
Sometimes we need global variables from outside a macro. As we can only declare them inside the on init callback we should declare all new variables immediately as soon as we are using them so that we don’t lose track.
declare macros like a function
this example outputs “$c is now 10”
macro my_macro (#a#,#b#) // #a# and #b# are arguments we use to pass values into the macro, the hashtags are required
     //any code in here will be printed where the macro gets called
     $c := #a# + #b# //$c is a global variable which has to be declared inside the on init callback before we call the macro.
     message("$c is now " & $c)
end macro

on init
     declare $c //make sure you declare $c before calling the macro
     my_macro(3,7) //this calls the macro passing 3 and 7
end on
this is how the above looks compiled (the way we would put it into Kontakt)
on init
 declare $c
 $c := 10
 message("$c is now " & $c)
end on
We can use macros to declare other functions or callbacks like “on ui_control” and use it to create all kinds of code elements we can imagine
this macro is used to create several sliders (with a custom image) and also to position them Individually
macro declare_knob (#name#,#posx#,#posy#,#width#,#height#,#image#)
    declare ui_slider $knob_#name#(0,1000000)
    make_persistent($knob_#name#)
    $knob_#name# -> width := #width#
    $knob_#name# -> height:= #height#
    $knob_#name# -> pos_x:= #posx#
    $knob_#name# -> pos_y:= #posy#
    $knob_#name# -> text := ""
    $knob_#name# -> default_value := 1000000 / 2
    $knob_#name# -> mouse_behaviour := -400
    $knob_#name# -> picture := "#image#"
end macro

on init
    make_perfview
    set_ui_height_px(200)
    set_ui_color(9666666h)

     //declare_knob (#name#,#posx#,#posy#,#width#,#height#,#image#)
     declare_knob(volume,220,112,40,40,knob_fx)
     declare_knob(pan,268,112,40,40,knob_fx)
     declare_knob(tuned,364,112,40,40,knob_fx)
     declare_knob(speed,412,112,40,40,knob_fx)
end on
as each knob (or slider) has the exact same code pattern we can bundle them into one macro. All individual parameters like position and size can be passed. We can then call the macro in the on init callback as many times as we want and create many many knobs in no time with only one line of code for each knob.
4. The advanced usage of macros
 now that we understand macros we can proceed to a more complex example and declare multiple ui elements and
 on ui_control callbacks.
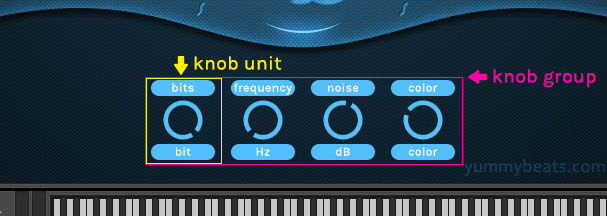
We will create a group of several knobs to control the LoFi FX. One group holds several knob units containing a top label, the knob itself and a sub label for the knob’s value (see image). Whereas the bottom label will display the current knob’s value when turning the knob. On release it falls back to the original label.
premium content


Kael Alden
Will this method work if I’ve used Creator Tools to setup my UI? I read somewhere that Creator Tools is not compatible with compact variables in Sublime.
Also, is there a way to “Apply from” a script inside the resources folder, or does it have to be copied and pasted manually with each edit? I can only get the “Apply from” to work if I save the script as a .txt file, but I imagine that won’t work with a compiled (compacted) script in Sublime.
Sorry if these are basic questions… I’m a noob.
YummyBeats
(in reply to Kael Alden)
No problem, we were all noobs once 🙂
In fact regarding the Creator Tools I’m a noob as well, to be honest. Becasue I never worked with them. For me (from a coder’s perspective), it makes life more complicated without giving me much benefit. At least as far as I know the Creator Tools.
But you can disable compact vars in Sublime Text and just work with your own variable names if this is the only issue with Creator Tools. To disable compact vars, go to Tools -> SublimeKSP and uncheck “Compact Variables”.
Yes you can “import” & execute external scripts stored in your resource container as txt file. Just read this tutorial: https://blog.yummybeats.com/ksp-kontakt-scripting/kontakt-scripting-ksp-basics-outsourcing-and-storing-script-files-into-the-resource-container/
Yes it works with compiled code as well. All the code you would put into the internal script tab works exactly the same. However you can’t use uncompiled SublimeKSP code of course. Because Kontakt simply does not understand it.
Patrick
(in reply to Kael Alden)
Will this method work if I’ve used Creator Tools to setup my UI? I read somewhere that Creator Tools is not compatible with compact variables in Sublime.
Yes, it works well. Basically, using Creator Tools allows you to quiickly flesh out a UI (I do it in parts), and even make reusable stuff. But essentially, it takes care of the declarations of stuff, and settings of all the basics. Then to utilize it you do this:
on init
	{MODEL DECLARATIONS}
	declare			params[]	:= (330000, 0, 0, 585730, 0, 531860)
	declare const 	NUM_PARAMS := params.SIZE
	make_persistent(params)

	{ INIT SCRIPT }
	message("")
	set_script_title(_SLOT_1_SCRIPT_TITLE_)
	set_snapshot_type(3)

	// Import & Load the Performance View
	import_nckp("../performance_view/gui.nckp")
	load_performance_view("gui")
end on
which imports those declarations and allows you to then reference them in your script.
You do need Compact Variables OFF, and can do this:
{ #pragma compile_without compact_variables }at the top of your code to ensure it. Remember, you have to use CMD-k to compile it.
Also, is there a way to “Apply from” a script inside the resources folder, or does it have to be copied and pasted manually with each edit? I can only get the “Apply from” to work if I save the script as a .txt file, but I imagine that won’t work with a compiled (compacted) script in Sublime.
Along those lines, if you use this:
{ #pragma save_compiled_source slot-1.txt }your code will be compile to the file slot-1.txt in the same directory as your source.ksp file. If you have them in the resources/scripts direcotry, you can then use “Apply from…” in the script editor of Kontakt to LINK the .txt file. So, once you compile it will automatically be updated in Kontakt.
This allows you to use a .ksp file as a source and have Sublime auto set to KSP syntax, while compiling to the .txt file that Kontakt (stupidly) requires to see the file to link.
Hope this helps someone.
Patrick
YummyBeats
(in reply to Patrick)
Thank you for the detailed instructions. I haven’t tried it myself yet, but it’s so comprehensive that it will certainly help some people!